
Docs
PunchOut Rocket documentation
Quick start
To set up PunchOut Rocket: create your account, add your e-commerce site and its connection settings, choose a plan, install the plugin, add an end customer for each buyer with the cXML or OCI credentials from their supplier documentation, map your categories to UNSPSC, test the connection from the dashboard and check the communication logs during the first PunchOut. With the Premium plan you can also offer predefined carts to your buyers and import their purchase orders into your store.
1. Introduction
This guide walks you through the setup of PunchOut Rocket, from your account to the first PunchOut session, so that your store connects to your customers’ eProcurement systems.
PunchOut Rocket is a SaaS gateway that connects your WooCommerce, Magento 2, PrestaShop, nopCommerce or custom store to procurement systems such as SAP Ariba, Coupa and Jaggaer, using cXML or OCI. The buyer starts a PunchOut from their procurement system, shops on your store with their contract prices and sends the cart back to create a purchase requisition.
The guide covers five areas:
- Account management: registration, dashboard, profile and billing details, two-factor authentication and password recovery.
- E-commerce site configuration: your store, the plan and subscription, the connection settings and the plan features.
- End customer configuration: one end customer for each buyer company, with its predefined carts and order import.
- Plugin setup on your e-commerce platform.
- Testing and monitoring: test sessions, communication logs and order logs.
The last sections explain frames, cookies and the reverse proxy, and how to solve the most common problems. For the protocols, read cXML vs OCI; every term is in the glossary.
2. Account management
2.1 Registration and first login
- Go to platform.punchoutrocket.com and click Register.
- Enter your name, your company details and your billing details: country, address, city, ZIP code, province or state and VAT number. Italian companies also enter the SDI code or the PEC address.
- Enter your email address and a secure password, then click Create Account.
- Log in: you land on the Dashboard.
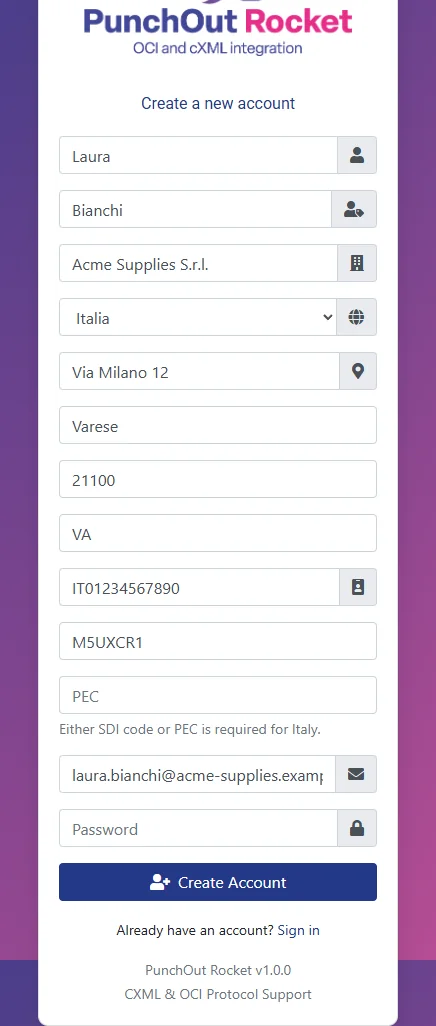
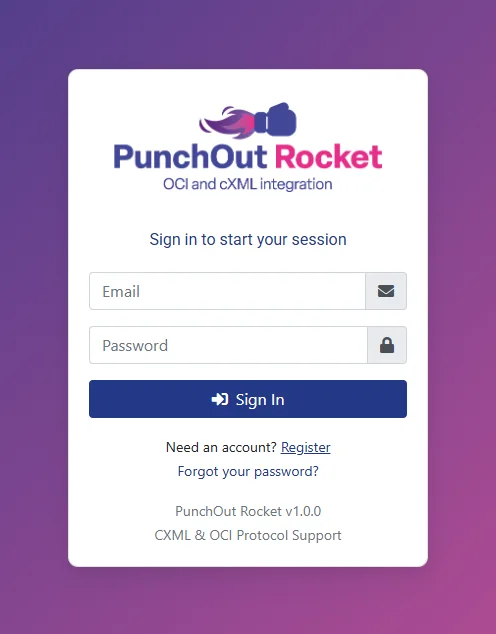
The 30-day free trial starts with your account and needs no credit card. During the trial all the features are active, including the Premium ones (predefined carts and order import).
2.2 The Dashboard
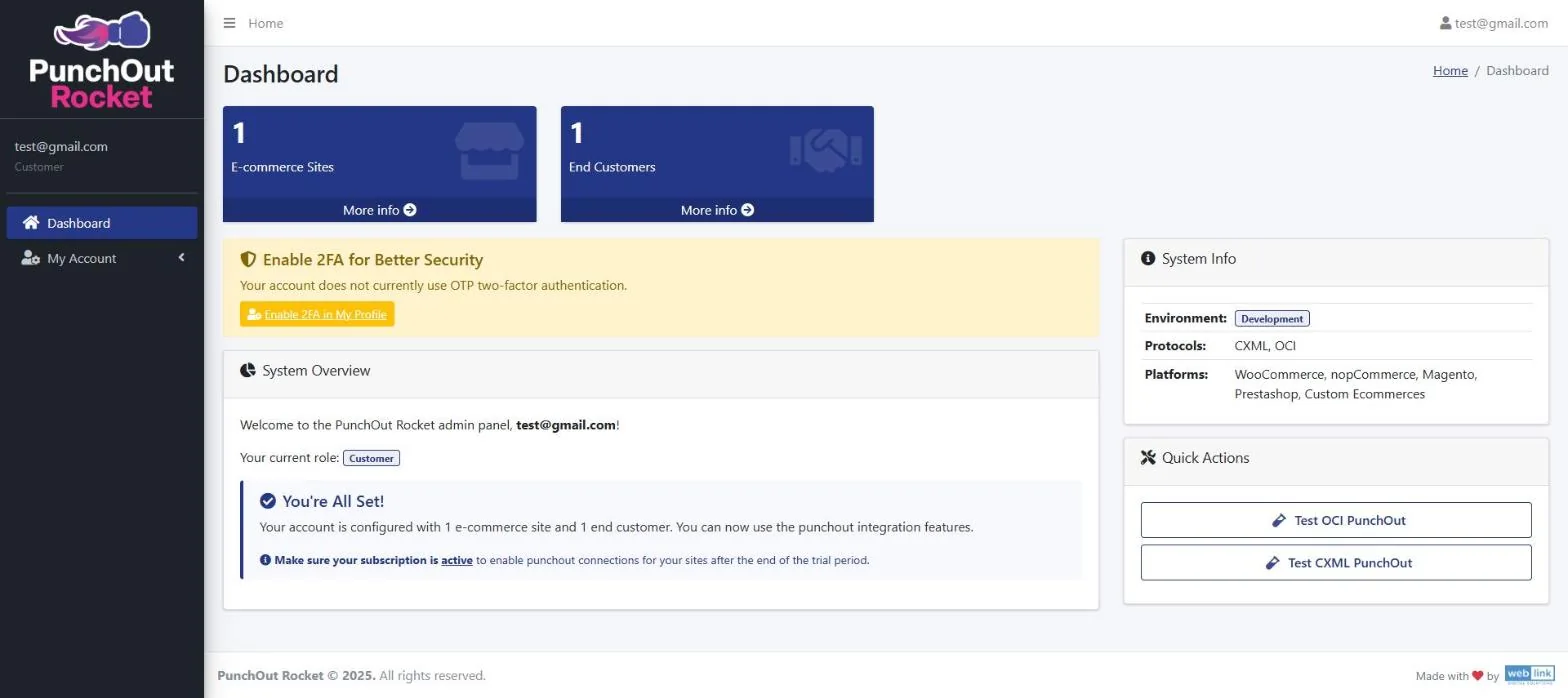
- Key metrics: the number of e-commerce sites and end customers you have configured.
- System overview: the next setup step. When your site and your first end customer are ready, the panel shows You’re All Set!
- System info: the supported environments, protocols and platforms.
- Quick Actions: Test OCI PunchOut and Test CXML PunchOut open the test pages (see section 6.1).
2.3 Managing your profile and billing details
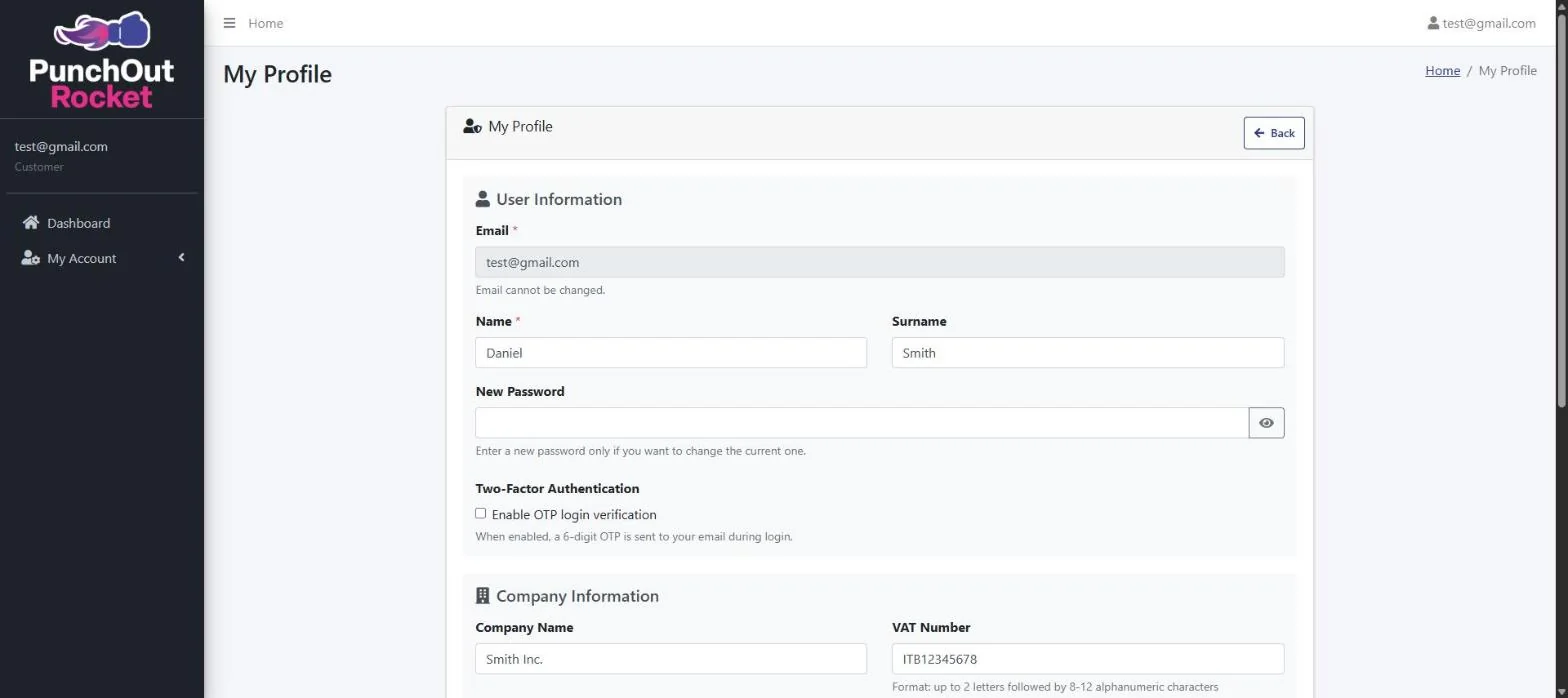
Open My Account › My Profile from the left sidebar.
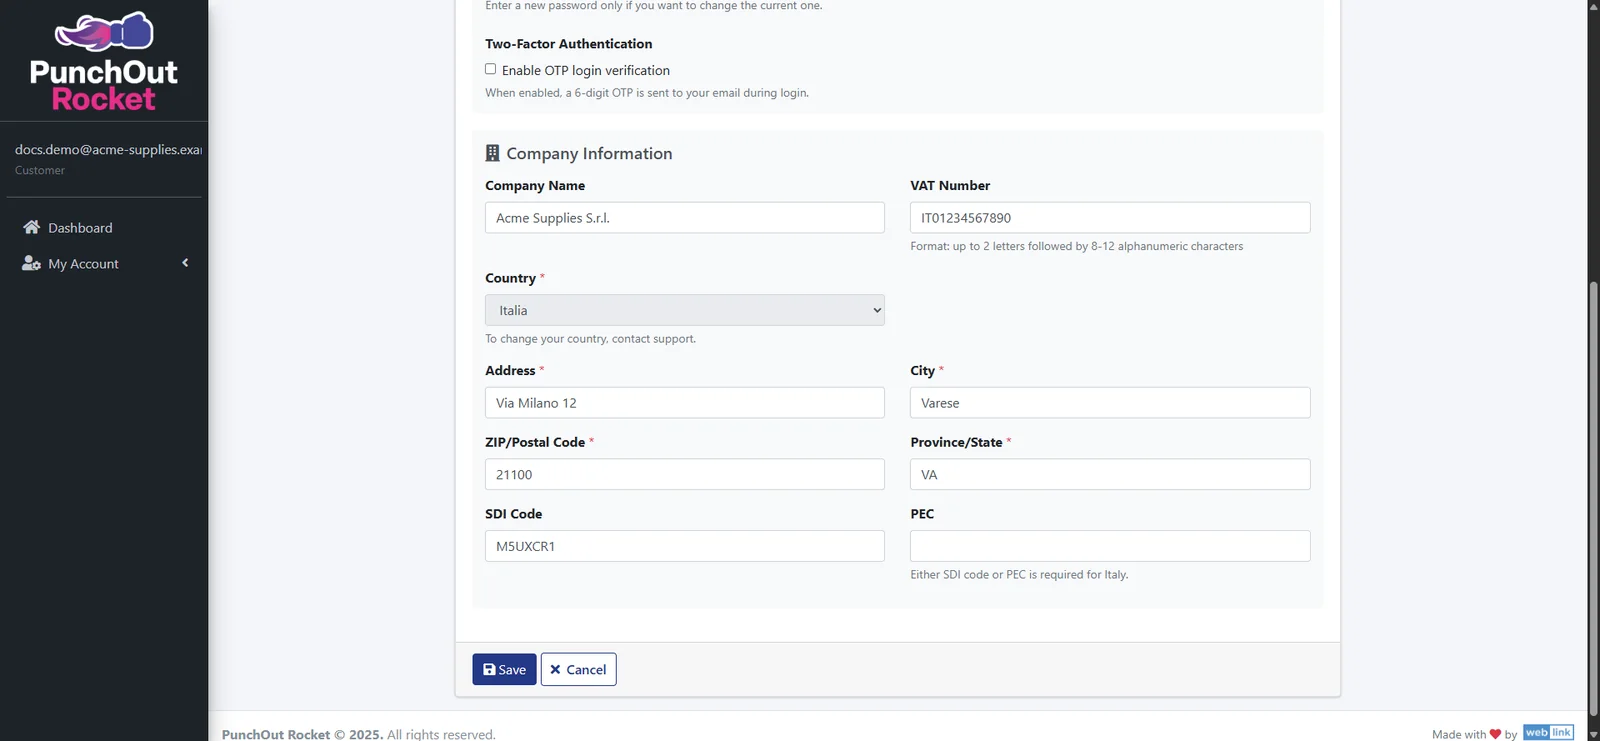
- User information: you can change your name, surname and password. Your email address is your username and cannot be changed.
- Company information: company name, VAT number, address, city, ZIP code and province or state. These details appear on your invoices. Italian companies must enter the SDI code or the PEC address.
- Country: the country sets the VAT treatment of your invoices (Italian VAT applies only to Italian companies). Once set, it can be changed only by our support team.
Click Save to apply the changes. The new billing details are also sent to the payment system and apply from the next invoice.
2.4 Two-factor authentication by email (optional)
Two-factor authentication is optional and recommended. When it is active, every login asks for a 6-digit one-time code sent to your registered email address.
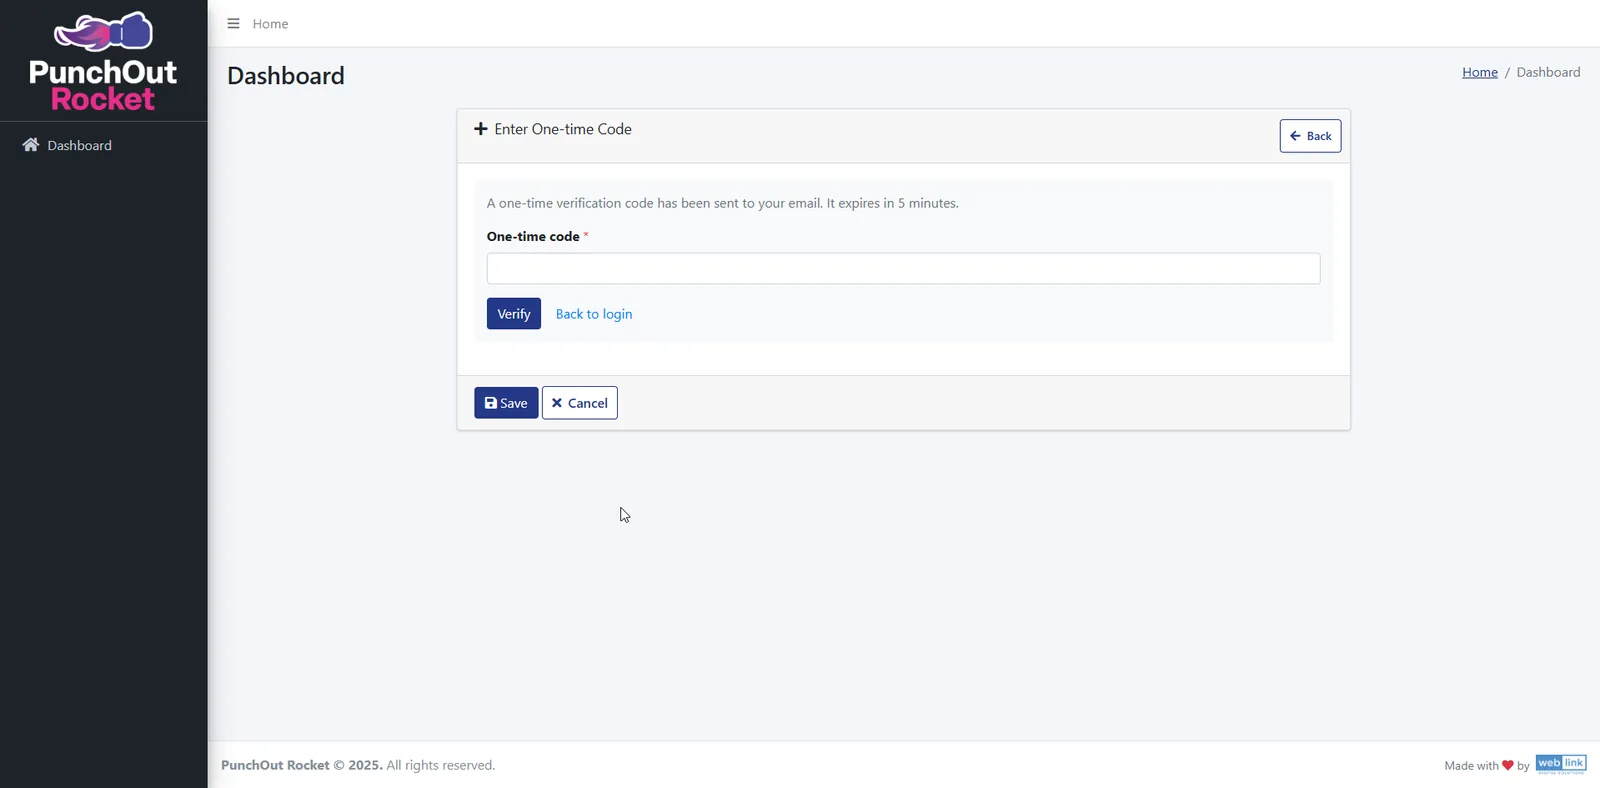
- Login with 2FA: enter your email and password, open the email with the code, type it on the Enter One-time Code page and click Verify. Codes expire after 5 minutes: if a code expires, sign in again to receive a new one.
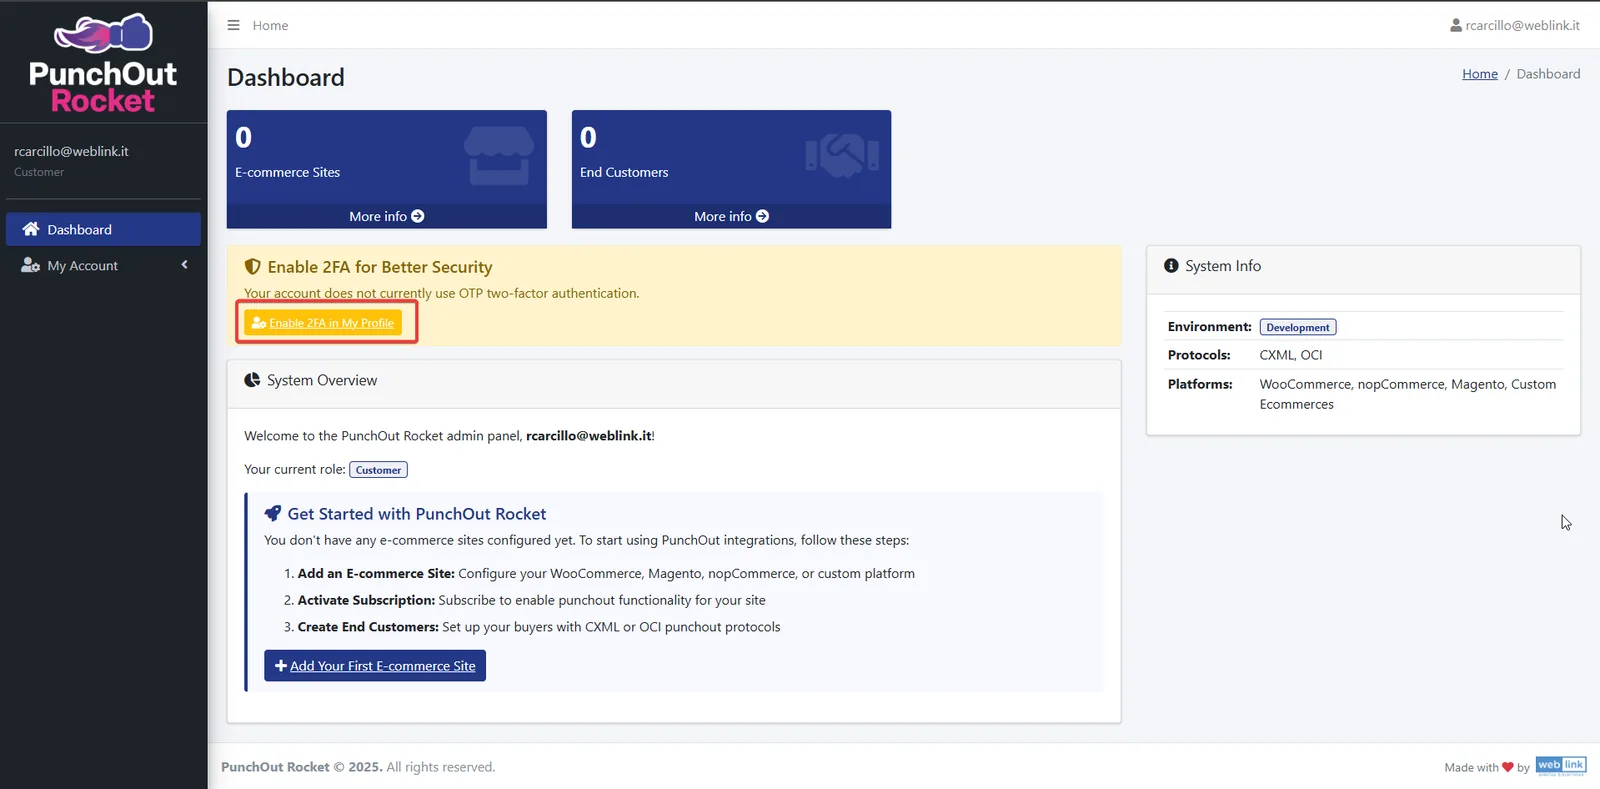
- Enable: from the security notice on the Dashboard (Enable 2FA in My Profile) or from My Profile, select Enable OTP login verification under Two-Factor Authentication and click Save. It applies from your next login.
- Disable: in My Profile, clear the same checkbox and click Save.
Before you enable it, make sure you can access your mailbox. If the code is late, check the spam folder.
2.5 Forgotten password
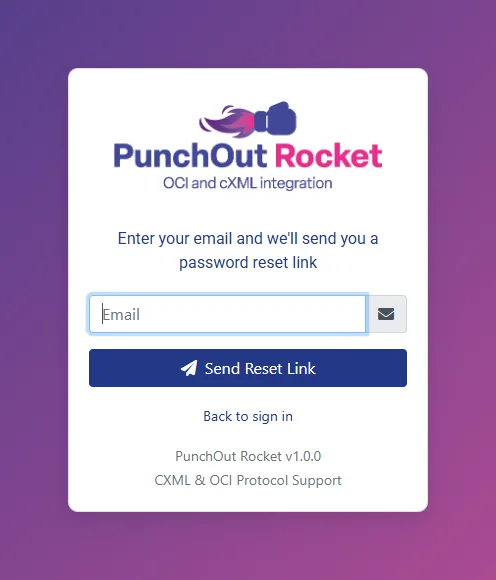
- On the login page, click Forgot your password?
- Enter the email address of your account and confirm.
- Open the email you receive and click the reset link. The link is valid for 4 hours.
- Enter your new password. You also receive an email that confirms the change.
3. E-commerce site configuration
Add your store, choose a plan and complete the connection settings.
3.1 Add your e-commerce site
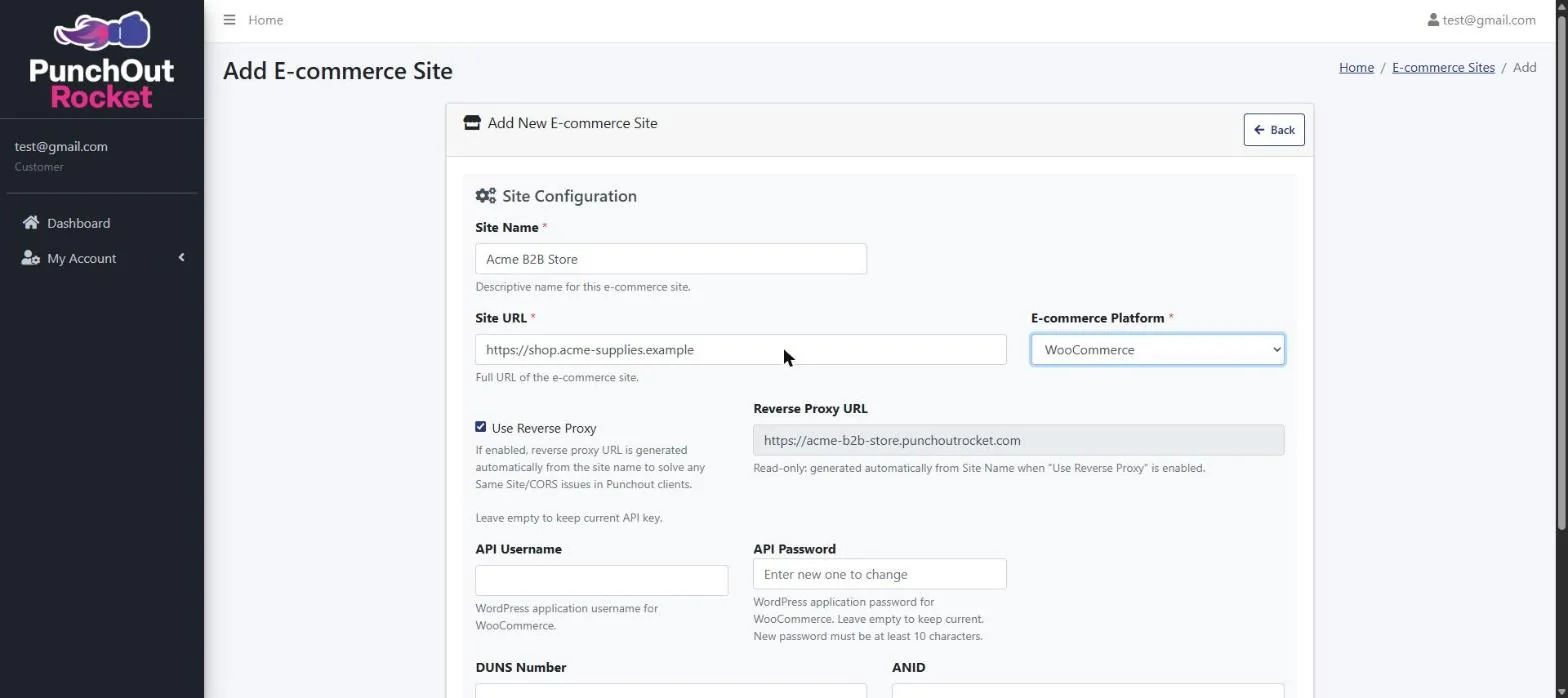
In the Get Started panel of the Dashboard, click + Add Your First E-commerce Site (or My Account › My E-commerce Sites › Add E-commerce Site) and fill in:
- Site Name: an internal label, for example “My Company B2B Store”. It also sets the address of the reverse proxy.
- Site URL: the full address of your store, including
https://. - E-commerce Platform: choose your platform from the list, for example WooCommerce.
- The connection credentials for your platform (see 3.4).
Click Save.
3.2 Choose your plan and subscribe
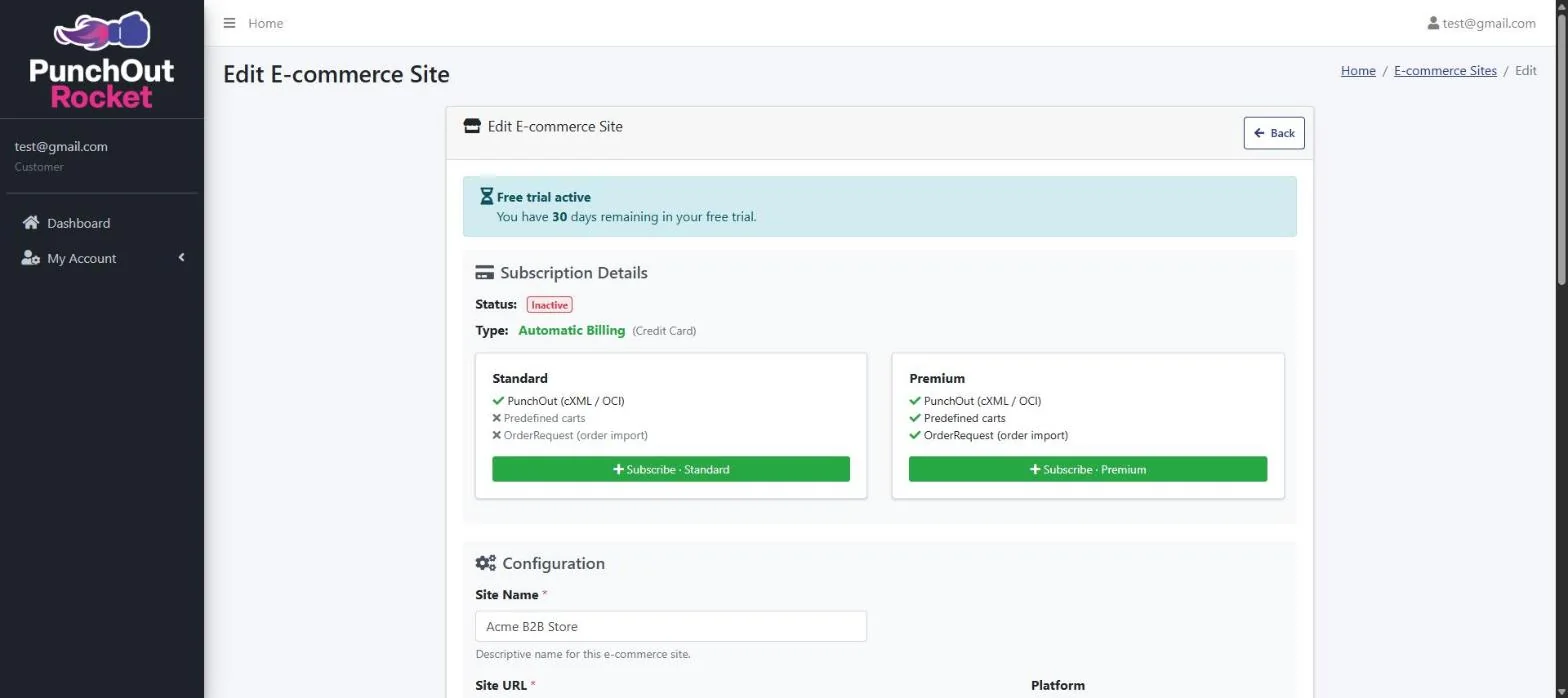
The site page shows the free trial days left and the subscription status. Two plans are available: Standard and Premium, which adds purchase order import and Predefined Carts.
| Standard | Premium | |
|---|---|---|
| PunchOut (cXML and OCI) | ✓ | ✓ |
| Predefined carts | — | ✓ |
| OrderRequest (order import) | — | ✓ |
- Under Subscription Details, click Subscribe · Standard or Subscribe · Premium.
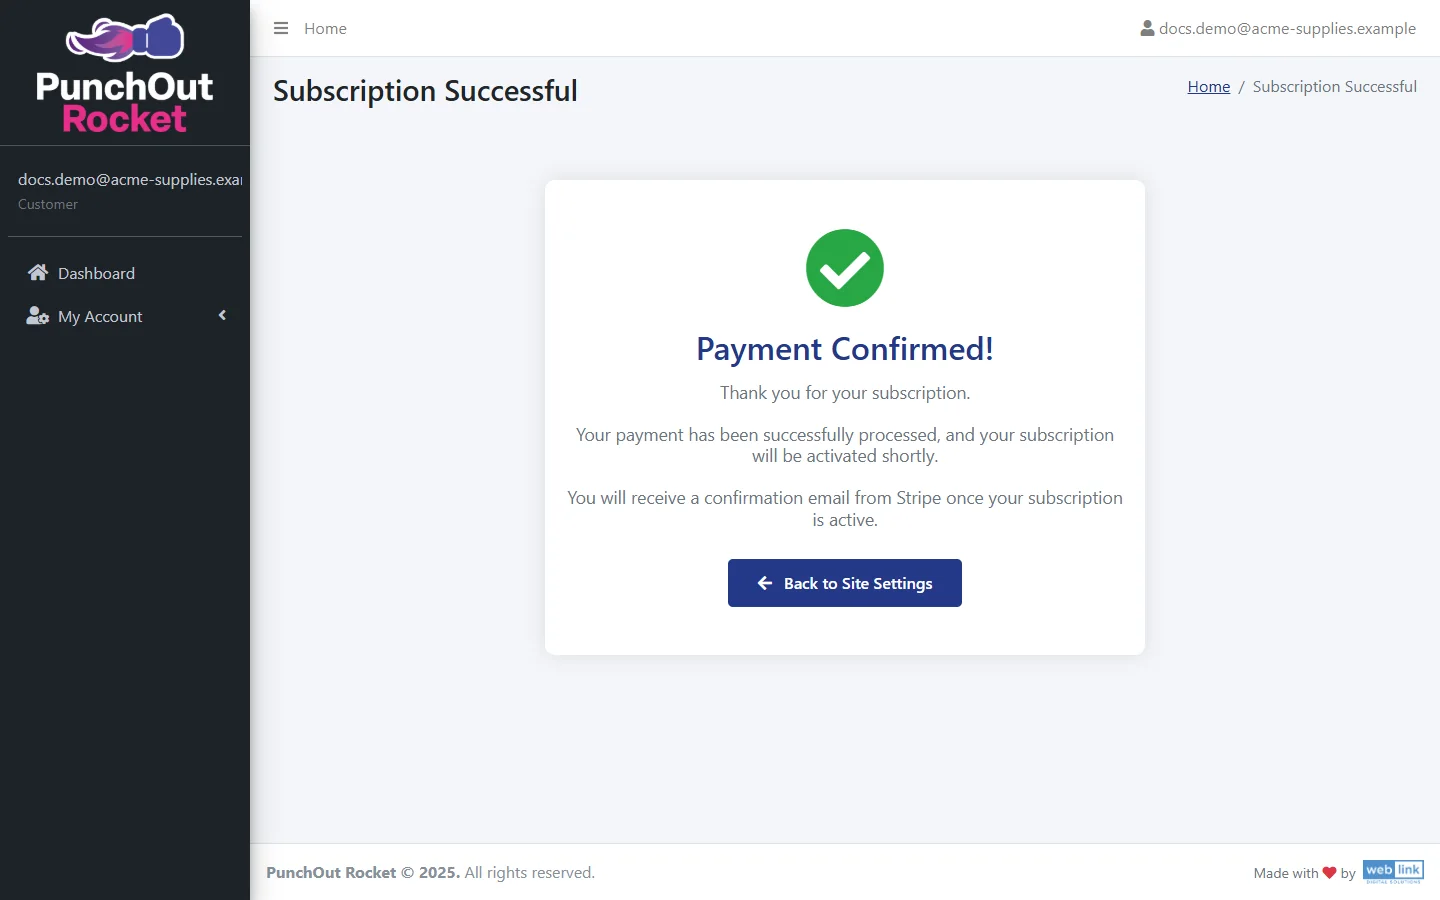
- Enter your payment details on the secure Stripe payment page.
- When the payment is confirmed, click Back to Site Settings.
If you subscribe to Standard, the Premium features are turned off at the end of the trial: your predefined carts are kept, but they are no longer offered to buyers. Premium keeps them on.
If we agreed a custom price with you, the site page offers a single Custom plan instead. Plans and buyer packs are on the pricing page.
3.3 Change plan or manage your subscription
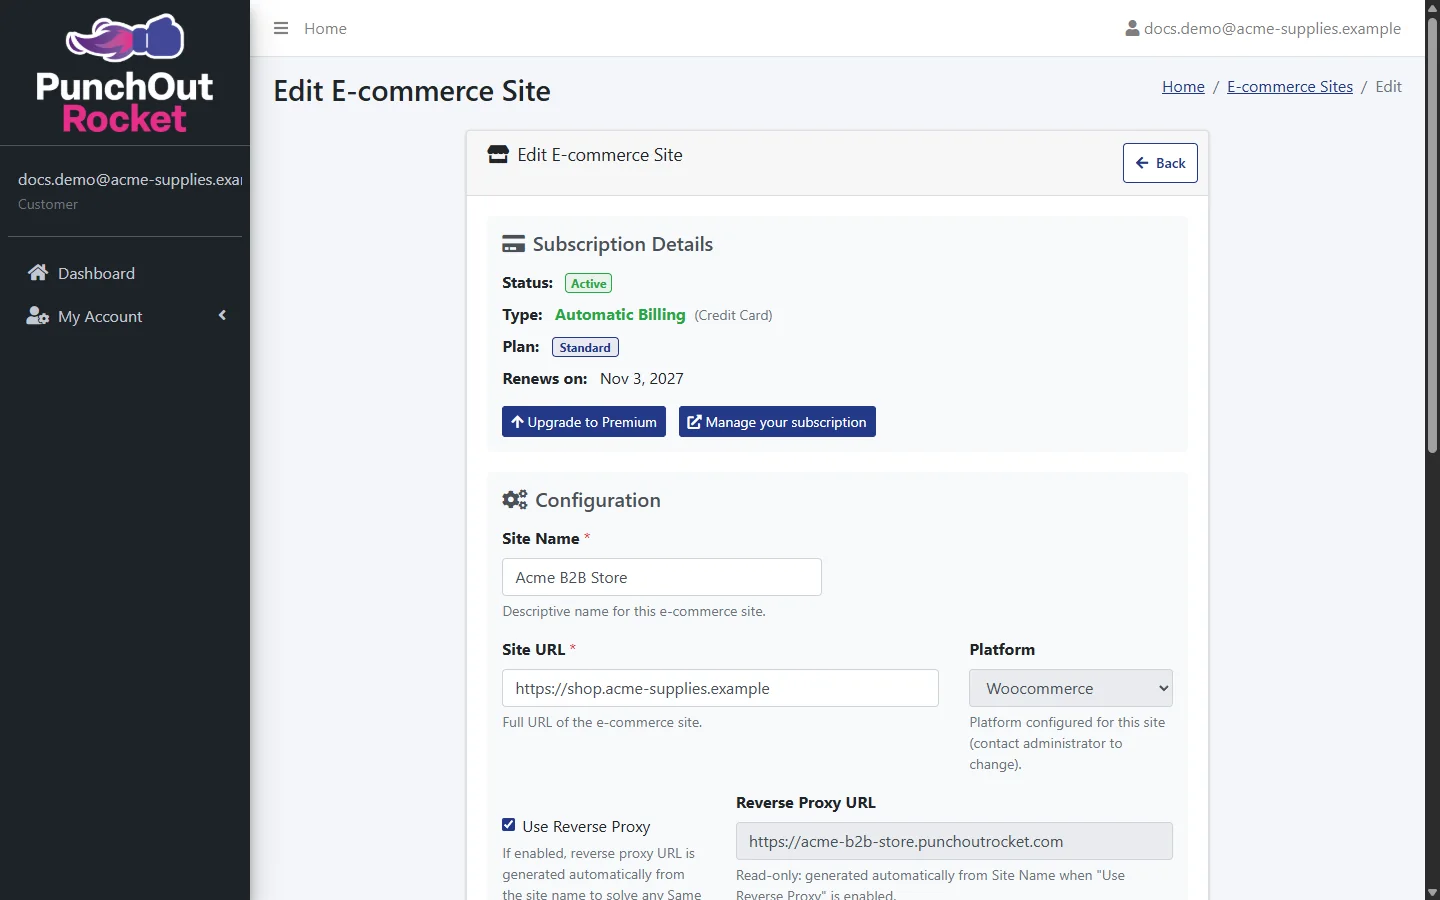
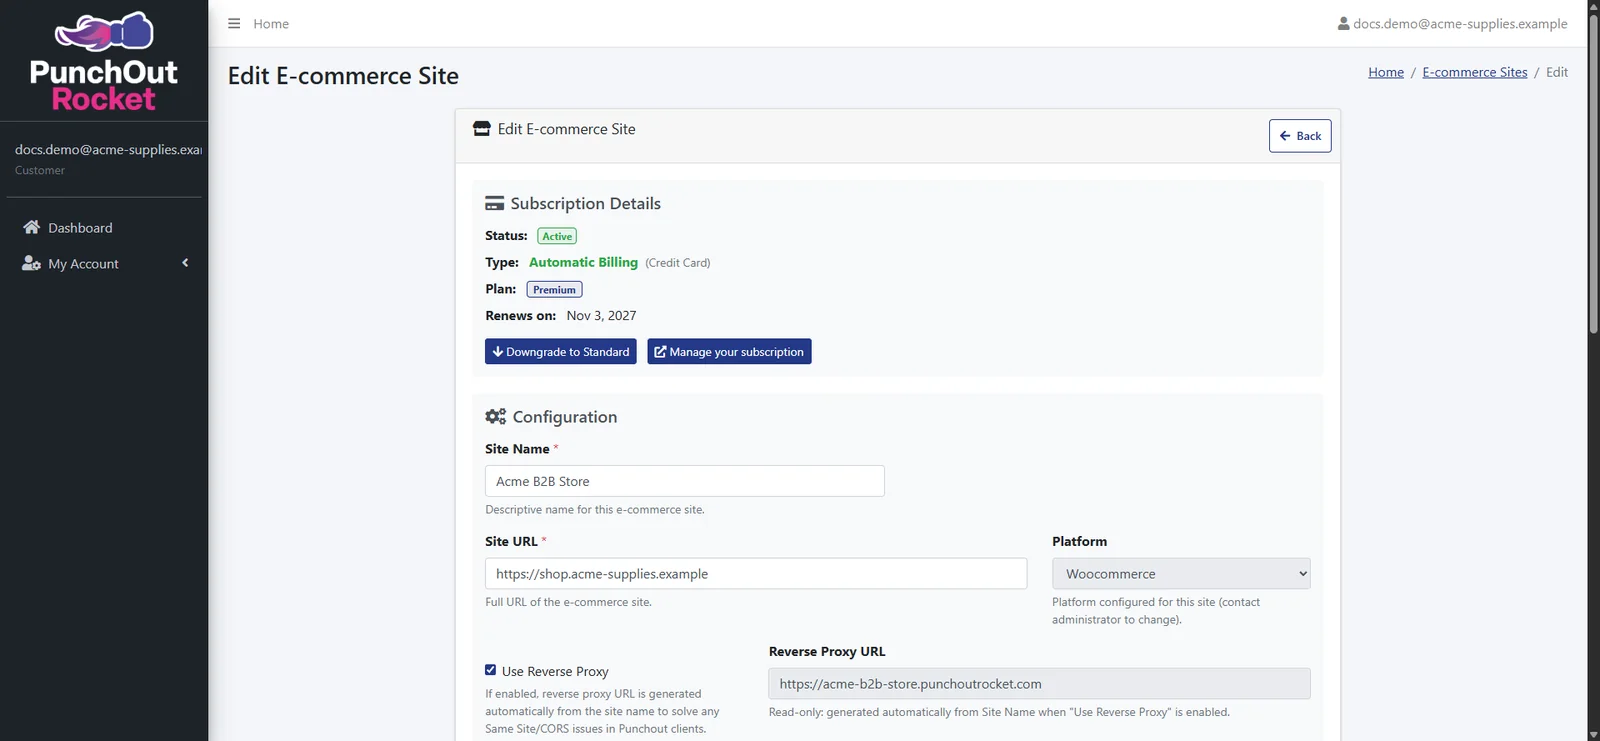
With an active card subscription, the site page shows:
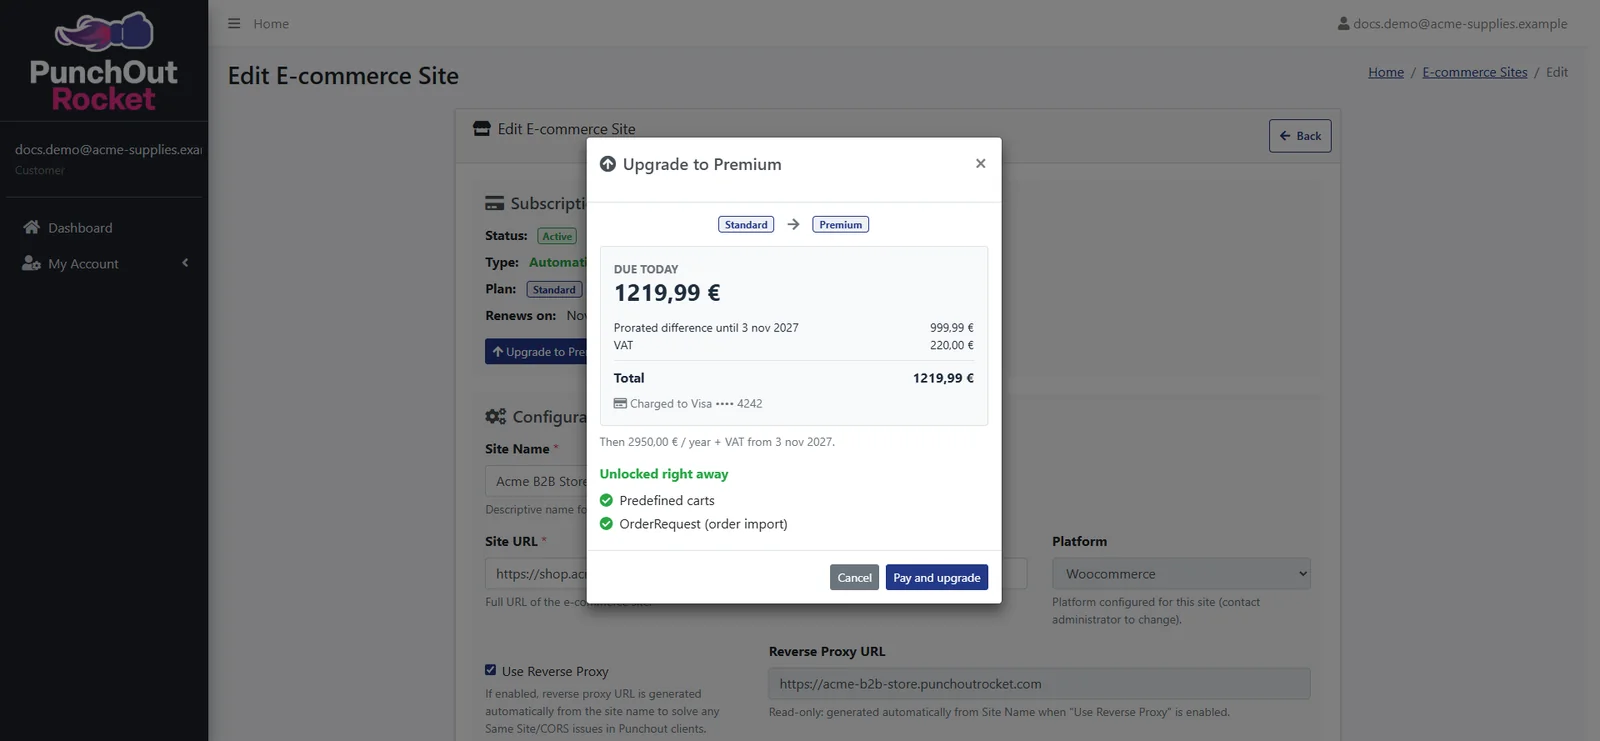
- Upgrade to Premium: a window shows the amount due today (the prorated difference until the renewal date, plus VAT), the card that will be charged, the price from the next renewal and the features unlocked. Click Pay and upgrade: the features are active at once.
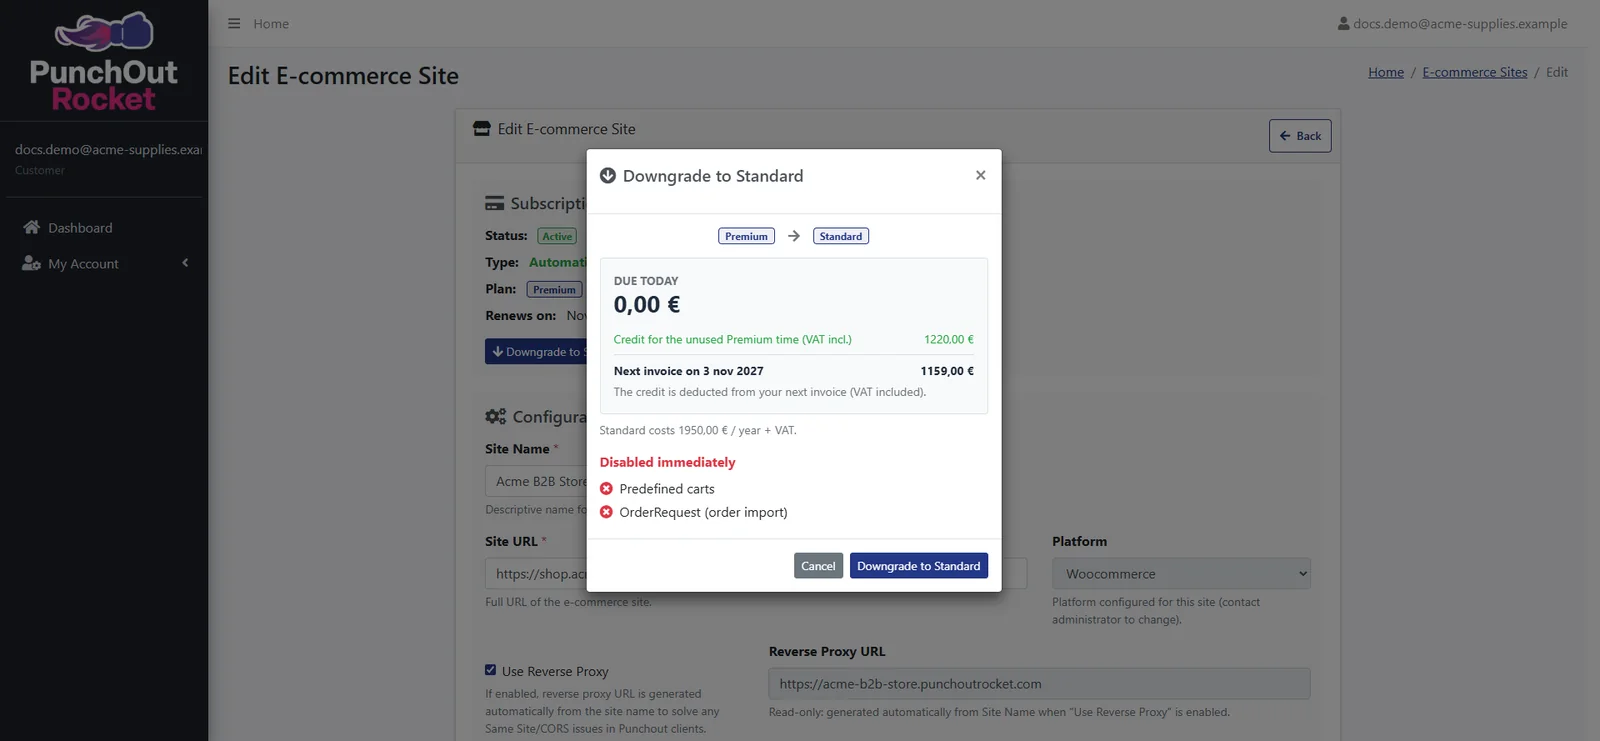
- Downgrade to Standard: the window shows the credit for the unused Premium time, which is deducted from your next invoice, and the features that are turned off at once. Nothing is charged today.
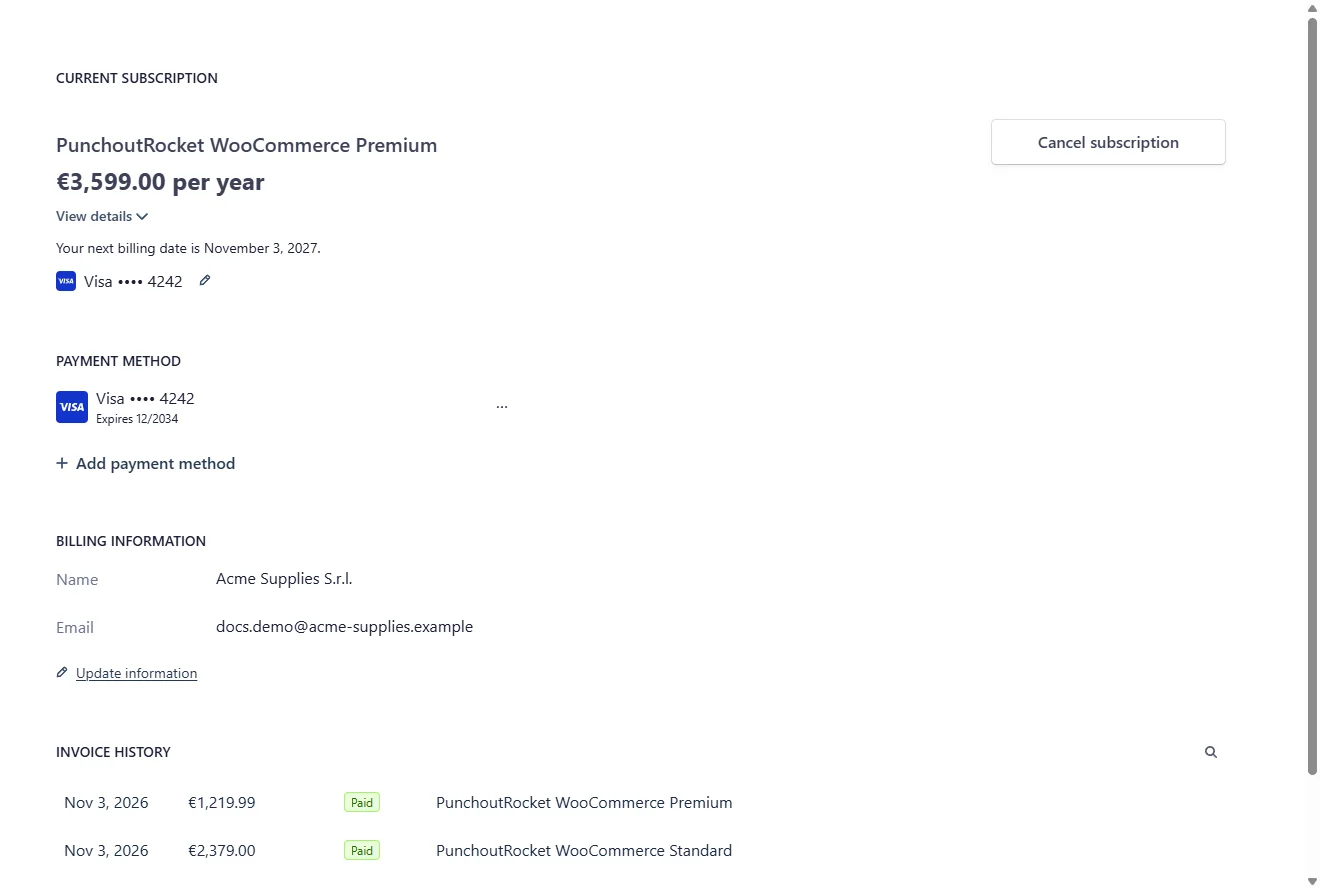
- Manage your subscription: opens the secure Stripe customer portal, where you can see your plan and the next payment date, change your payment method, update your billing details, download your invoices or cancel the subscription.
3.4 Complete the site settings
Some settings depend on your platform; these are common to all sites:
- Use Reverse Proxy: on by default. During PunchOut sessions the store is served through PunchOut Rocket, which avoids the frame and cookie blocks of procurement systems with no change to your server. See section 7.
- Reverse Proxy URL: read-only, generated from the Site Name. It is the entry point of the PunchOut sessions; you do not set it.
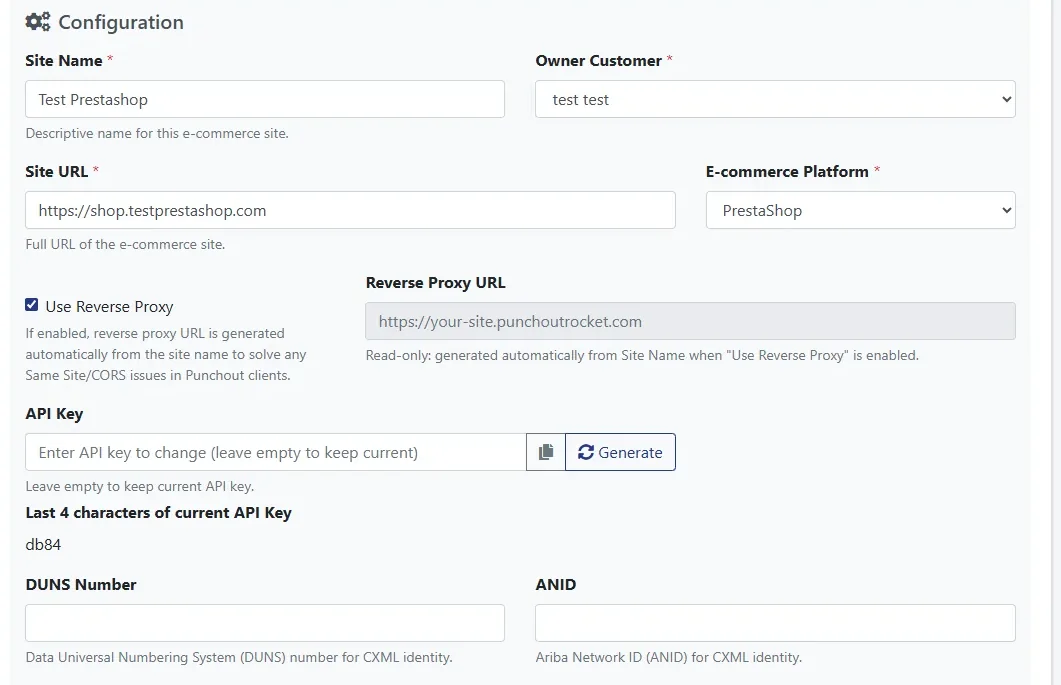
- DUNS number and ANID (Ariba Network ID): optional cXML identifiers. Enter them if your customer requires them: they are sent back with the cart.
- API credentials: stored encrypted. After saving, only the last 4 characters are shown. If you leave a password field empty, the saved value is kept. New passwords must be at least 10 characters long.
WordPress / WooCommerce
- API Username: the WordPress user that PunchOut Rocket uses for the REST API.
- API Password: the application password of that user, created in the user profile as described in the WordPress application passwords documentation.
Magento 2 / Adobe Commerce
- API Username: the Magento admin user used for the REST API.
- API Password: the password of that admin user.
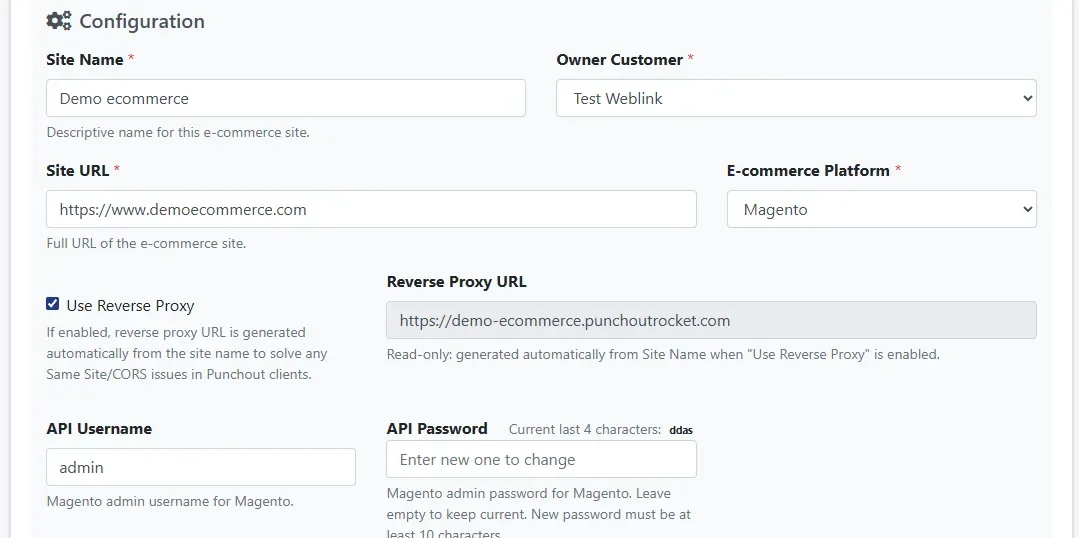
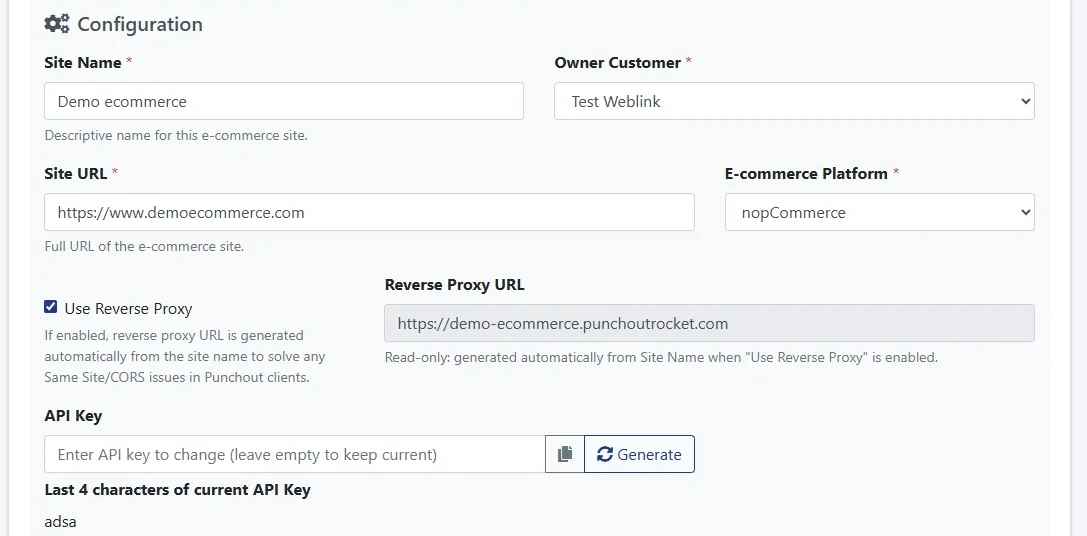
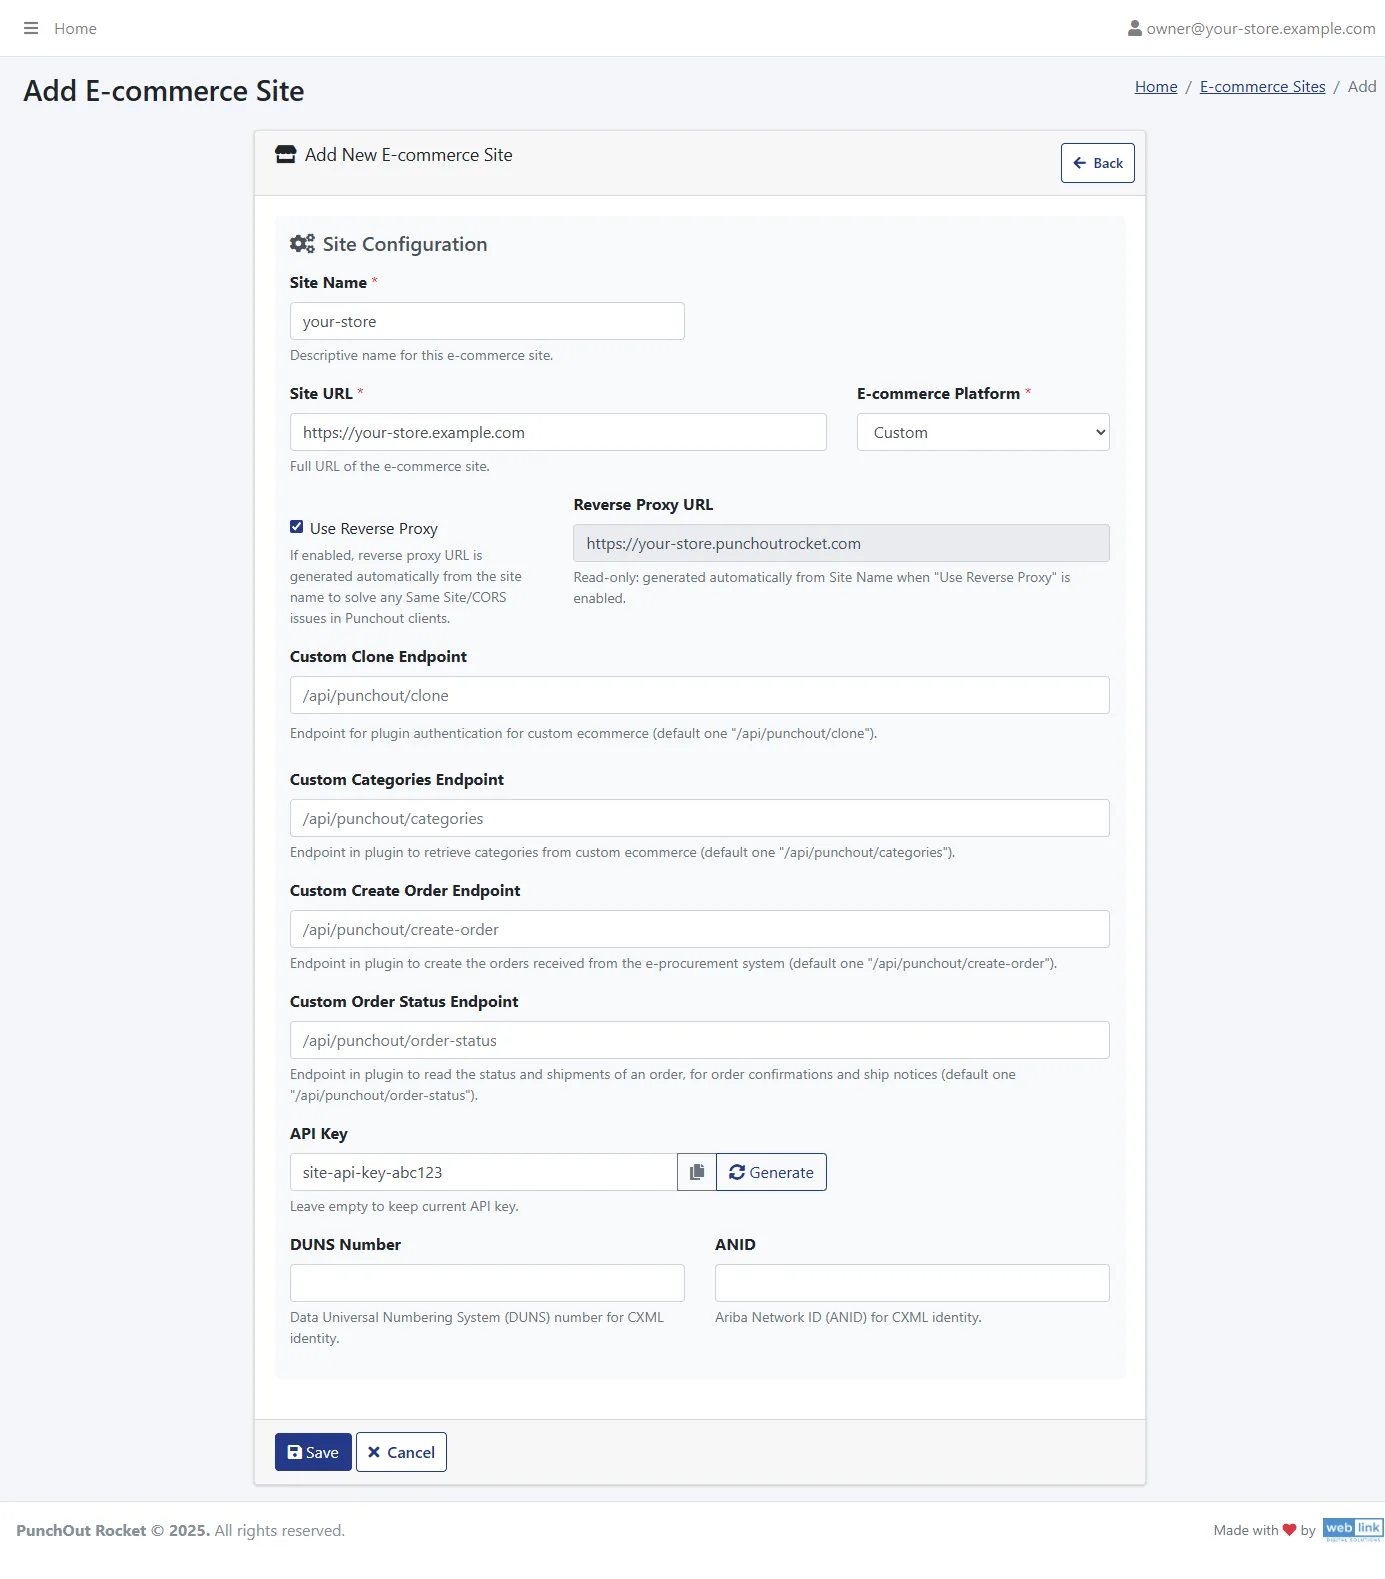
nopCommerce, PrestaShop 8+ and custom platforms
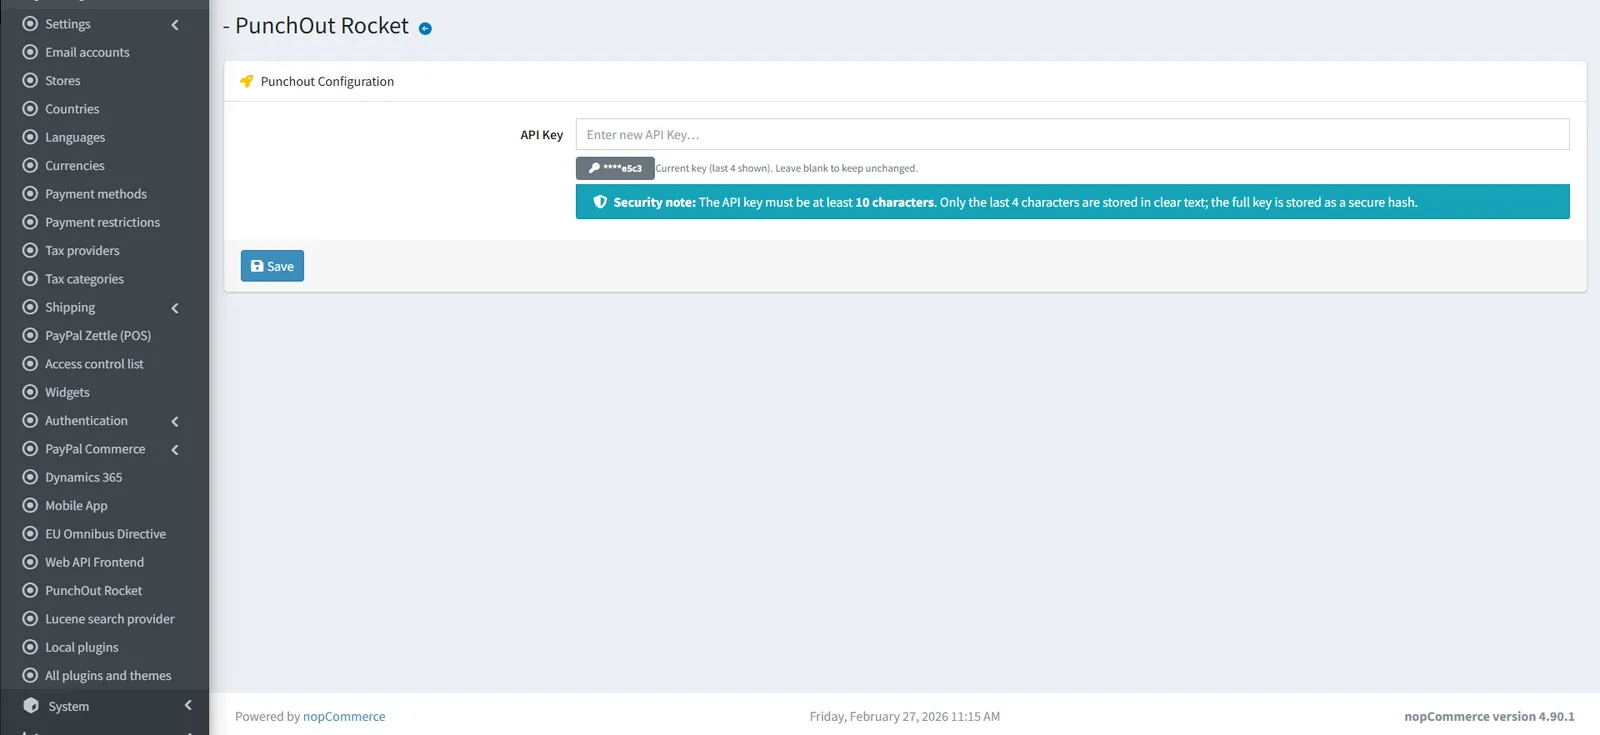
- API Key: click Generate to create a unique secret key, copy it and paste it in the PunchOut Rocket plugin settings (or in your custom integration). Only the last 4 characters are shown after saving.
- For a custom store, the integration is described in the integration specification.
3.5 Plan features
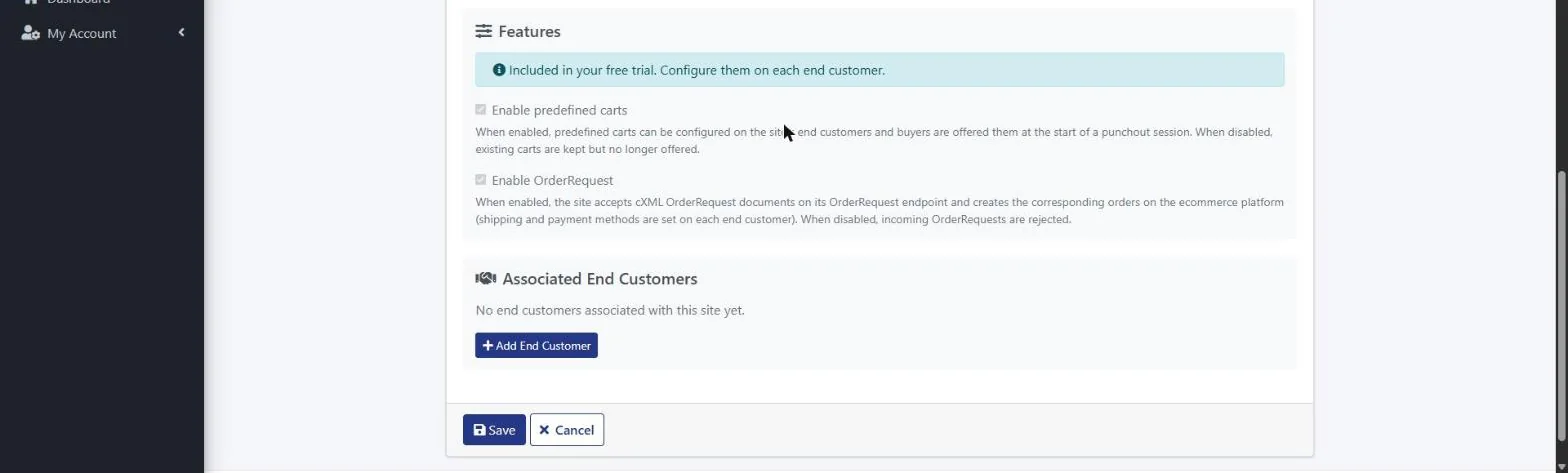
The Features section of the site page shows the features included in your plan or in your free trial:
- Predefined carts: you can prepare ready-made carts for each end customer, and buyers can send them to their procurement system with one click (see 4.5).
- OrderRequest: the site accepts the cXML purchase orders of your buyers and creates the matching orders in your store (see 4.6).
The features follow your plan and cannot be changed here: you configure them on each end customer.
Too busy to configure this yourself? Go-Live Assist: our team configures the connection for you.
4. End customer configuration
An end customer is one of your customer companies, the buyer that opens your catalogue from its procurement system. Each end customer has its own connection settings.
4.1 Create a new end customer
On the edit page of your site, find Associated End Customers and click + Add End Customer. You can also use My Account › My End Customers.
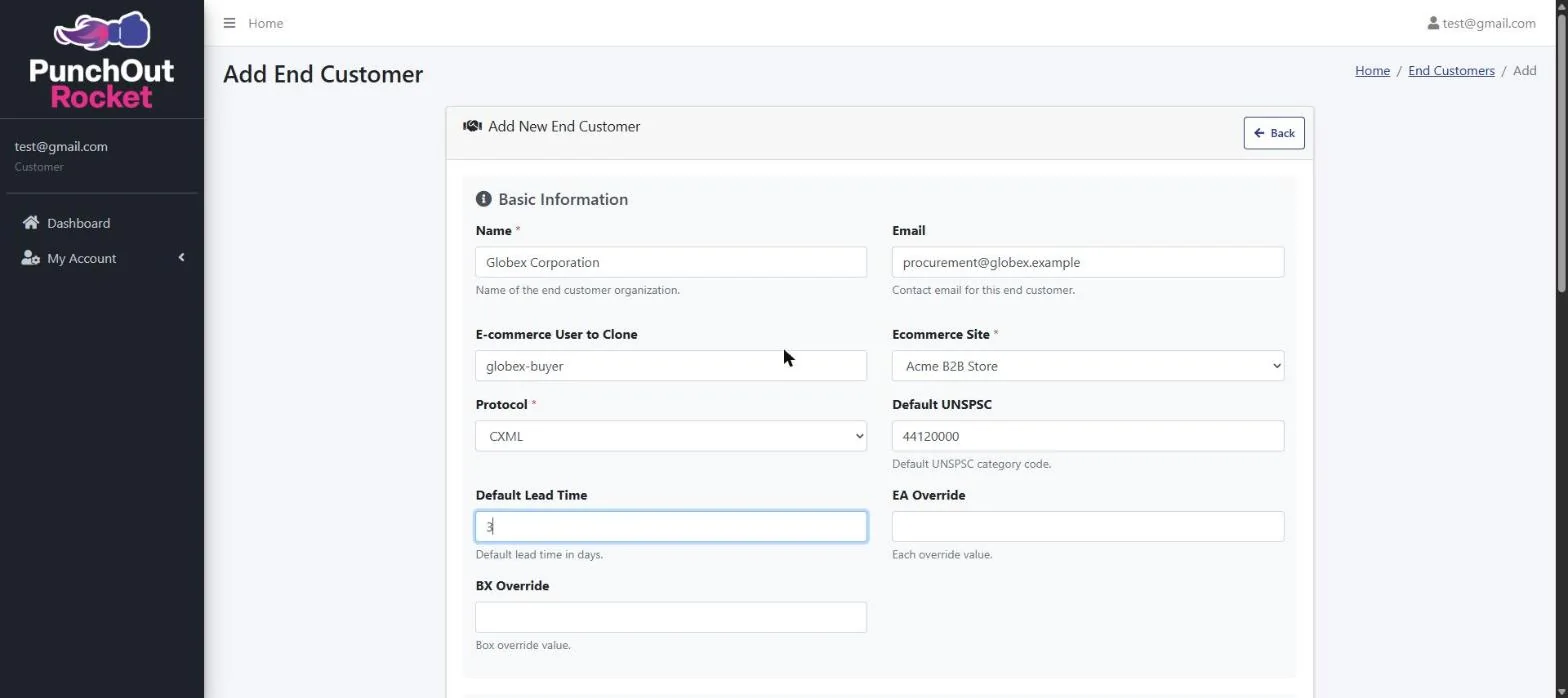
4.2 General settings
- Name: a label for the customer company.
- Email: a contact email for this customer (optional).
- E-commerce User to Clone: the email or username of a dedicated user in your store. Its role and permissions define the catalogue and prices the buyer sees: during the PunchOut, PunchOut Rocket opens the store with this user’s session.
- Ecommerce Site: the site this customer buys from.
- Protocol: cXML or OCI, as required by the buyer’s system.
- Default UNSPSC: the classification code sent for products whose category has no code mapped.
- Default Lead Time: the estimated delivery time in days, sent with every item in the cart.
- EA Override and BX Override: replace the default units of measure (EA for each, BX for box) with the codes the buyer’s system expects, for example PCE.
4.3 Protocol configuration (cXML and OCI)
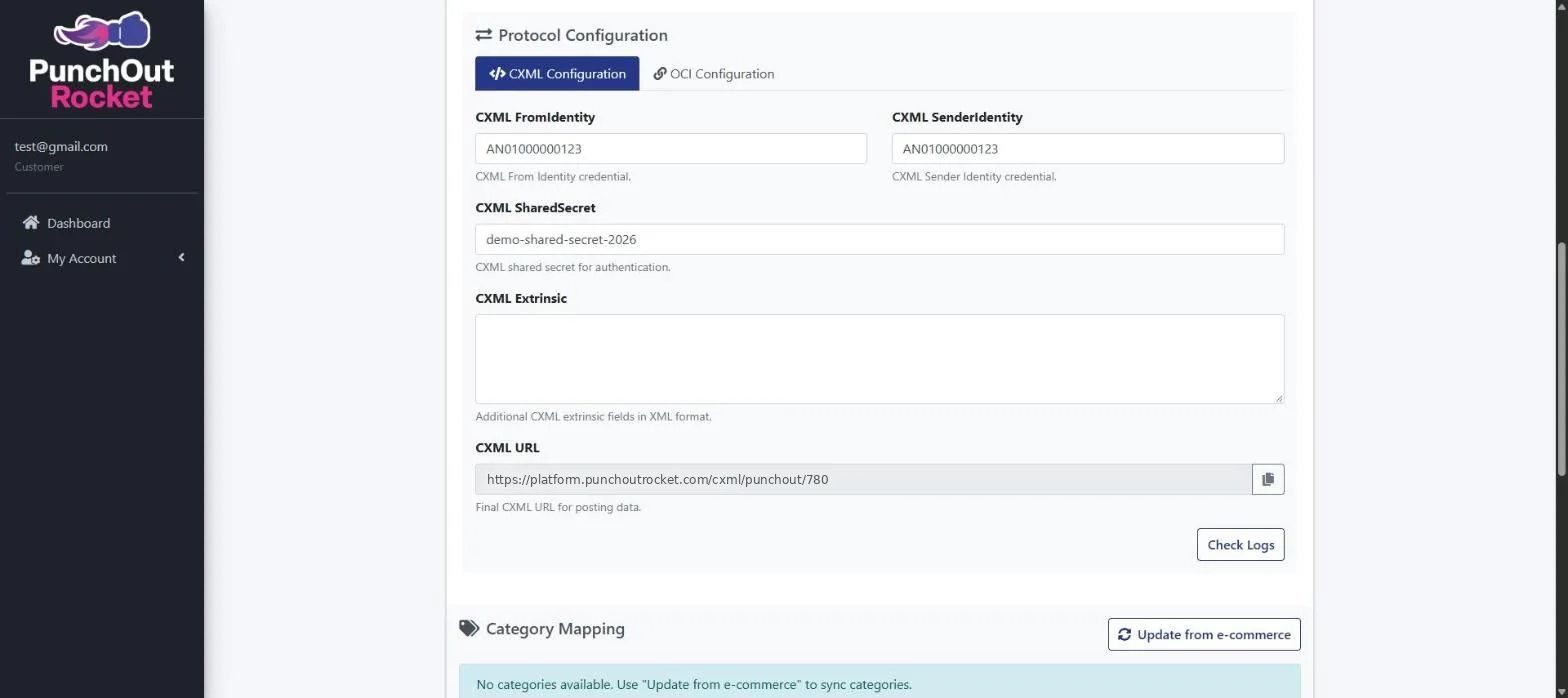
Enter the credentials provided by your customer’s procurement team. They must match the buyer’s system exactly.
- cXML: From Identity, Sender Identity, Shared Secret, optional extrinsic fields, and the CXML URL to give to the buyer as the PunchOut setup URL.
- OCI: the key-value login parameters, including username and password, any optional fields to return with the cart, and the OCI URL to give to the buyer.
Where to find these values for each system: SAP Ariba, Coupa, Jaggaer, SAP via OCI.
4.4 Category mapping
- Click Update from e-commerce to import your category tree.
- Enter the matching UNSPSC code for each category, where possible.
With mapped categories the buyer’s system receives more detailed product data and can approve and report on purchases correctly. See PunchOut categories and UNSPSC.
4.5 Predefined carts Premium
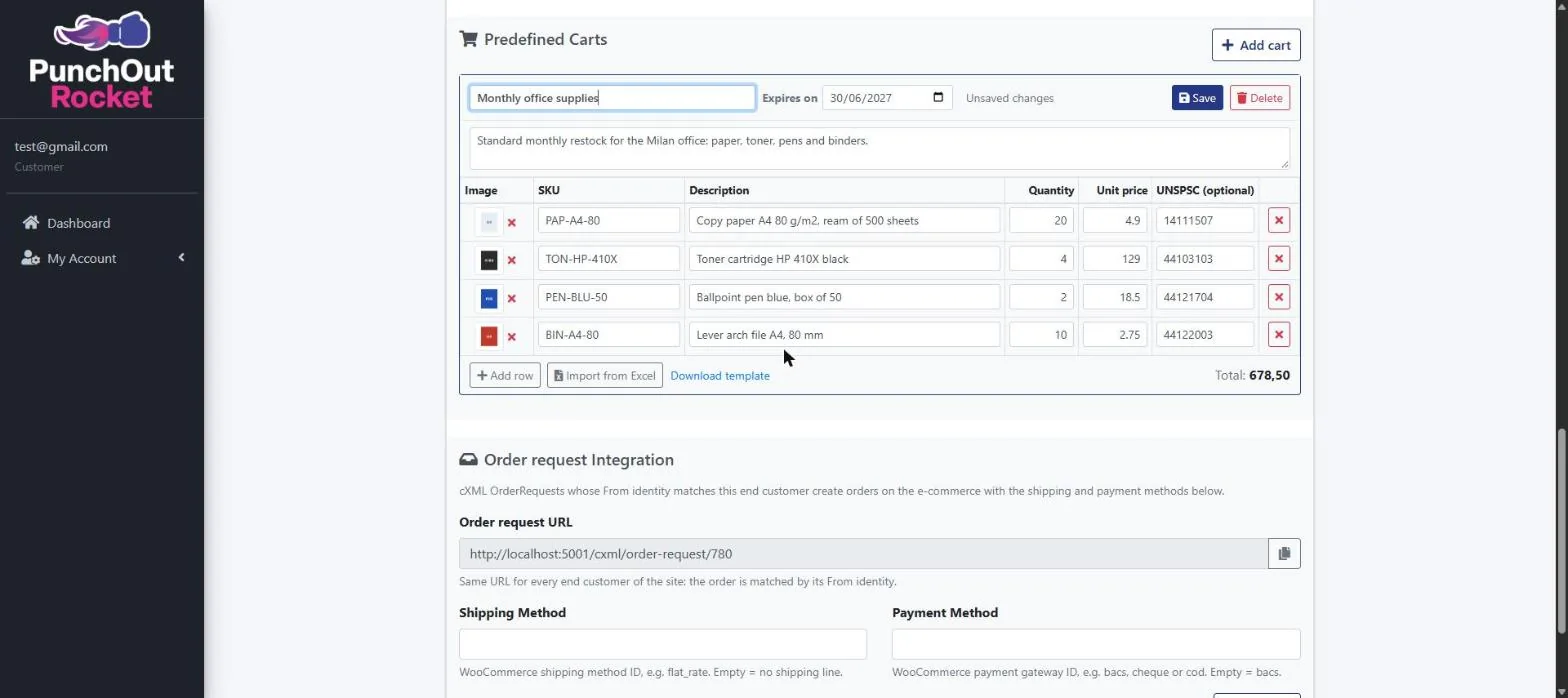
A predefined cart is a ready-made list of products for one end customer, for example the monthly restock of an office. At the start of a PunchOut session the buyer can send it to the procurement system with one click, without browsing the store.
The section is shown when your plan (or your free trial) includes predefined carts. Save the end customer first, then:
- Click Add cart.
- Enter the cart name and, if you want, a description: the buyer sees both.
- Optionally set Expires on: after that date the cart is no longer offered. Leave it empty for a cart that never expires.
- Add the products, one per row: SKU, Description, Quantity, Unit price and, optionally, the UNSPSC code. The total is calculated as you type.
- Optionally add a product image to each row with the image button (PNG, JPEG, GIF or WebP, up to 5 MB).
- Click Save on the cart. Each cart is saved on its own.
Import rows from Excel
- Click Download template to get an example .xlsx file.
- Fill it in with the columns SKU, Description, Quantity, Unit price and UNSPSC (SKU and Description are required), then click Import from Excel: the rows are added to the cart.
- Only the first sheet is read, with up to 1,000 rows. Italian column names (Codice, Descrizione, Quantità, Prezzo) are also recognised.
What the buyer sees
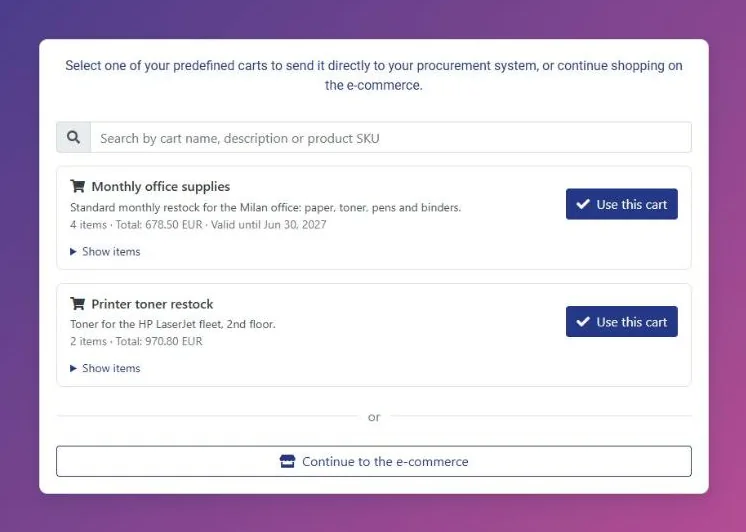
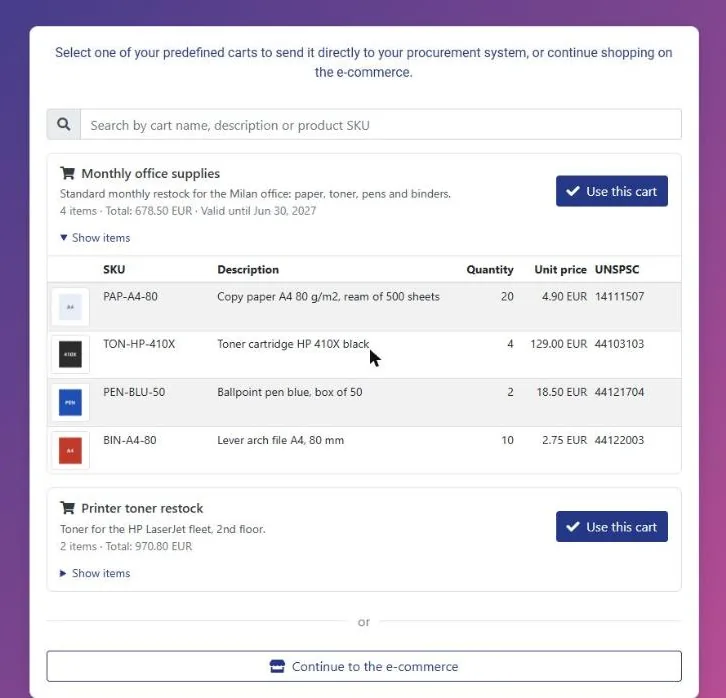
When the buyer starts a PunchOut (a new session, not an edit of an existing cart) and has at least one valid cart, a selection page opens before the store:
- the buyer can search carts by name, description or product SKU;
- Show items lists the products with image, SKU, quantity and price;
- Use this cart sends the cart straight to the procurement system, as if the buyer had checked out in the store;
- Continue to the e-commerce opens your store as usual.
The selection page link is valid for 8 hours from the start of the session.
4.6 Order import with cXML OrderRequest Premium
With OrderRequest, the purchase orders approved in the buyer’s procurement system arrive in your store as normal orders. You do not need to enter them by hand.
The Order request Integration section of the end customer shows:
- Order request URL: the address to give to the buyer for its purchase orders. It is the same for every end customer of the site: each order is matched to the end customer by its cXML From identity.
- Shipping Method and Payment Method: the methods used for the orders created in your store.
| Platform | Shipping method | Payment method |
|---|---|---|
| WooCommerce | Shipping method ID, e.g. flat_rate (empty = no shipping line) | Payment gateway ID, e.g. bacs, cheque or cod (empty = bacs) |
| Magento 2 | Shipping method code, e.g. freeshipping_freeshipping | Payment method code, e.g. cashondelivery |
| PrestaShop | Active carrier name, as in Shipping › Carriers | Technical name of an active payment module, e.g. ps_wirepayment |
| nopCommerce | Shipping method name, e.g. Ground | Payment method system name, e.g. Payments.CheckMoneyOrder |
For Magento and PrestaShop fill in both methods to import orders. For a custom store, both methods are passed to your create order endpoint: see the integration specification.
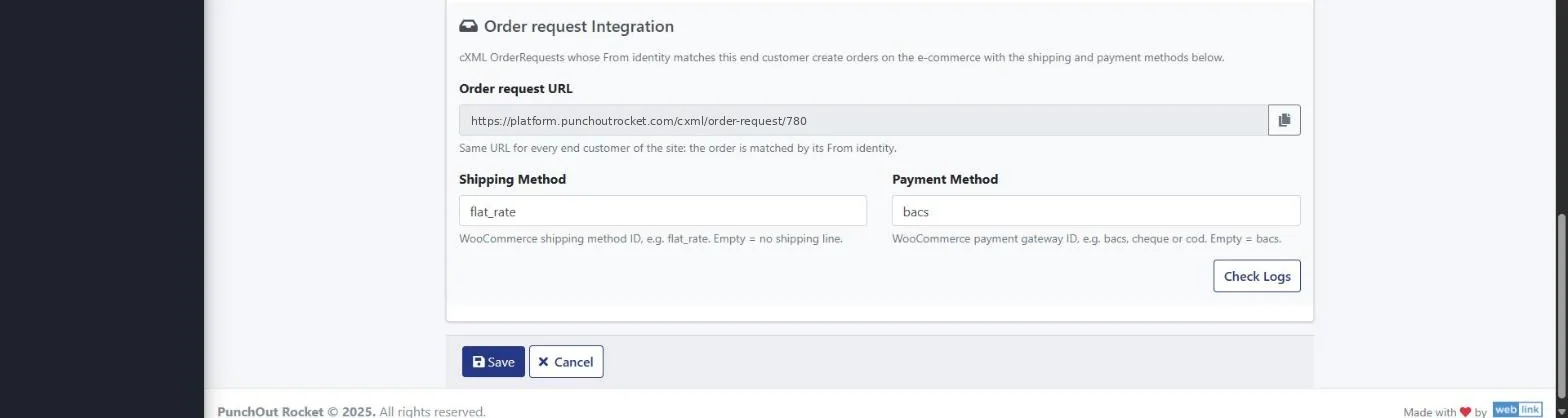
Click Check Logs in the same section to see the orders received (see 6.3).
Too busy to configure this yourself? Go-Live Assist: our team configures the connection for you.
5. Plugin setup on your e-commerce platform
- Download and install the PunchOut Rocket plugin for your platform.
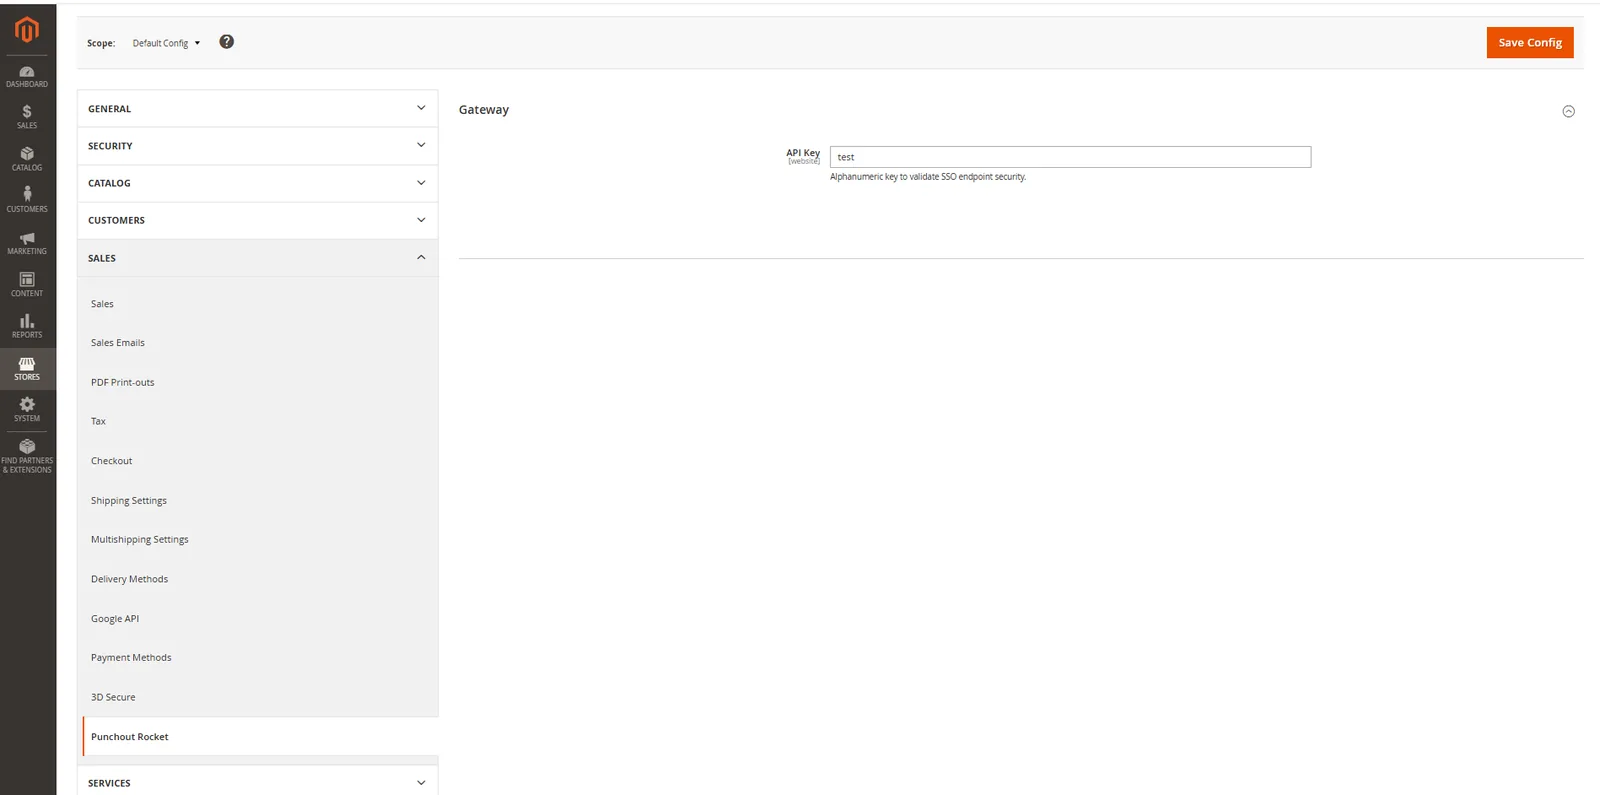
- Open the plugin settings page in your store’s admin (in Magento, under the Sales settings).
- Enter the connection details from section 3.4 and save.
Your store is now ready to receive PunchOut requests.
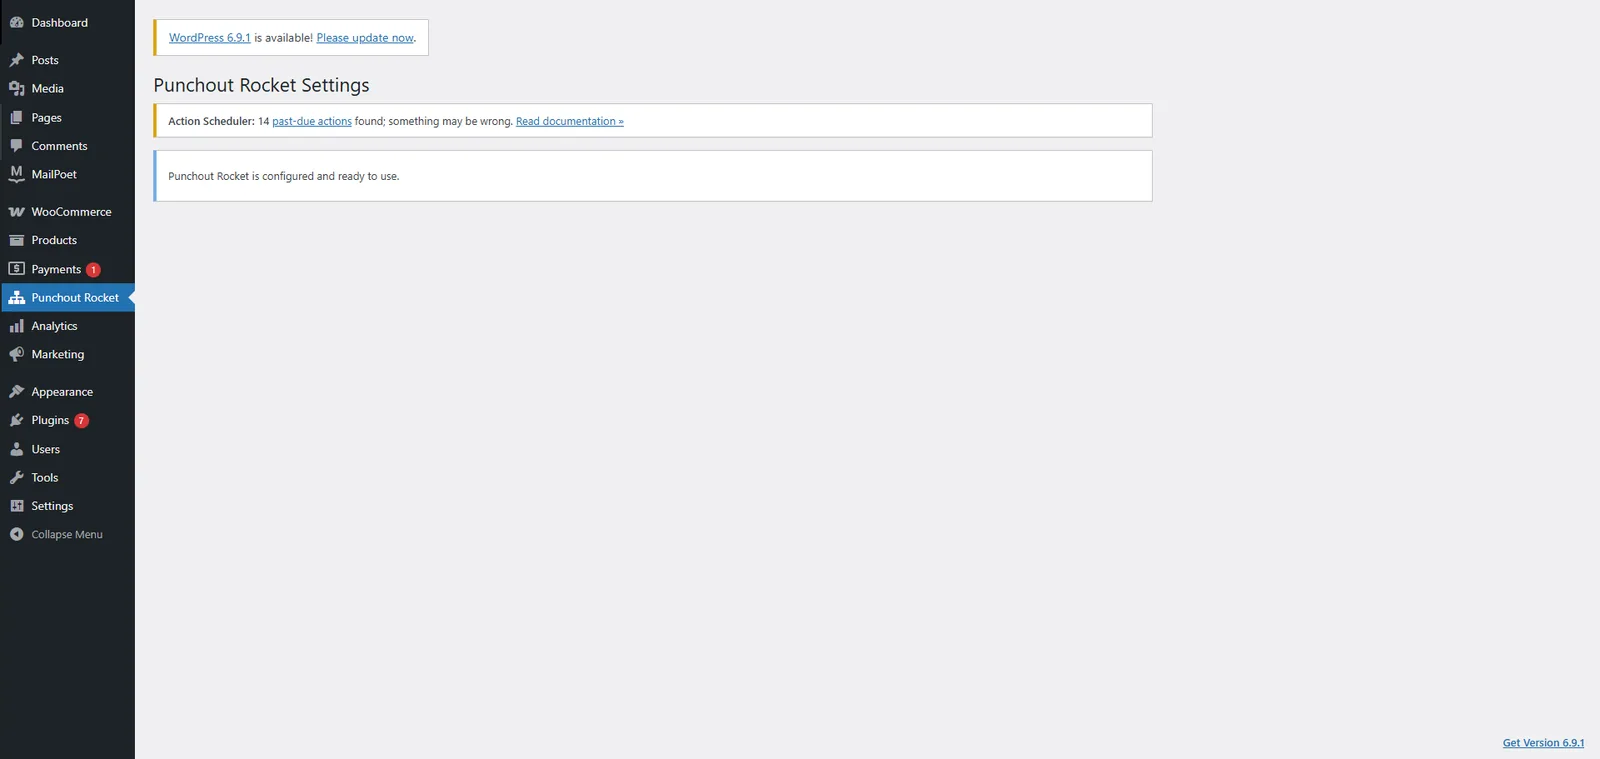
- WooCommerce: the connection uses the API username and application password entered in the site settings (3.4). The plugin page confirms when PunchOut Rocket is configured and ready to use.
- Magento 2: the extension settings are under Stores › Configuration › Sales › Punchout Rocket, in the Gateway group.
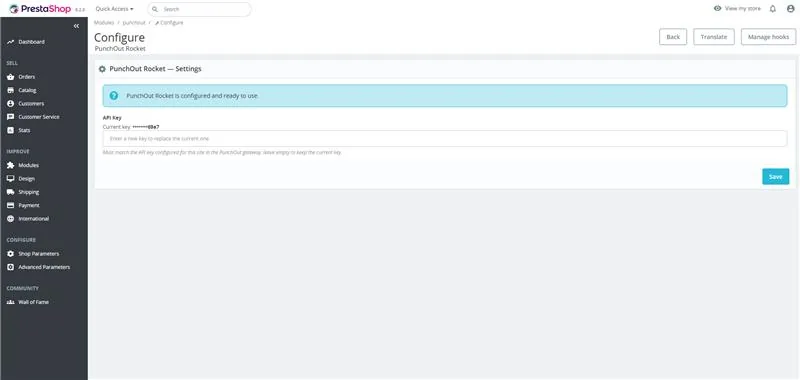
- nopCommerce and PrestaShop: paste the API key generated in the site settings (3.4) in the plugin or module configuration and save.
| Platform | What you install | Page |
|---|---|---|
| WooCommerce | WordPress plugin | WooCommerce plugin |
| Magento 2 / Adobe Commerce | Extension | Magento extension |
| PrestaShop | Module | PrestaShop module |
| nopCommerce | Plugin | nopCommerce plugin |
| Custom or headless | Your code, through the REST API | REST API |
Supported versions are on the compatibility page. Your store must be served over HTTPS.
Too busy to configure this yourself? Go-Live Assist: our team configures the connection for you.
6. Testing and monitoring
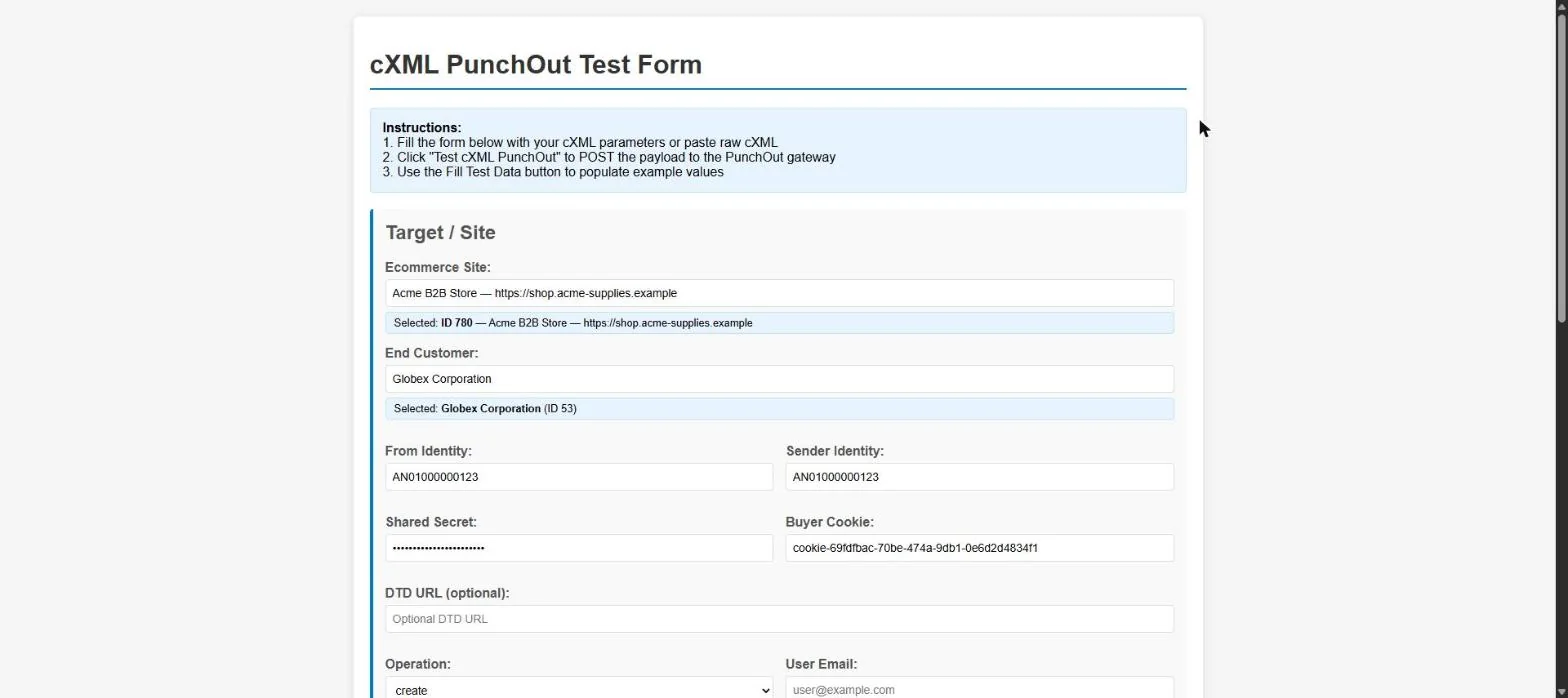
6.1 Test a PunchOut session
Before you give the URLs to your buyer, you can simulate the buyer’s procurement system:
- On the Dashboard, under Quick Actions, click Test CXML PunchOut or Test OCI PunchOut.
- Search and select your Ecommerce Site, then the End Customer: the credentials are filled in from its configuration.
- Send the test request: the store opens as it would for the buyer, and you can add products and return the cart.
6.2 Communication logs
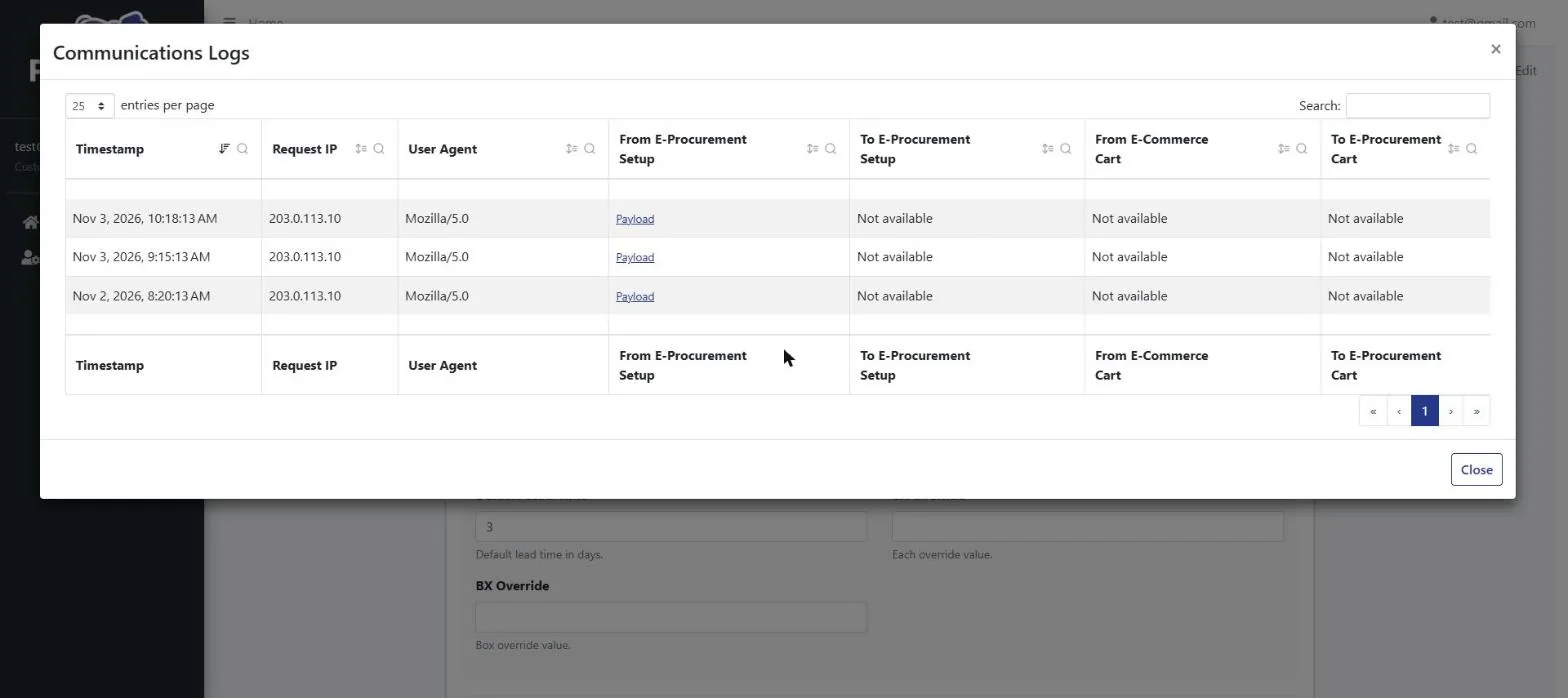
- Open the configuration page of the end customer.
- In Protocol Configuration, click Check Logs.
The log lists every PunchOut session with its time, IP address and browser. For each session you can open the messages exchanged: the setup request from the procurement system, the setup response, the cart from your store and the cart sent back to the buyer. It is the first thing to check when a connection does not work.
6.3 Order logs Premium
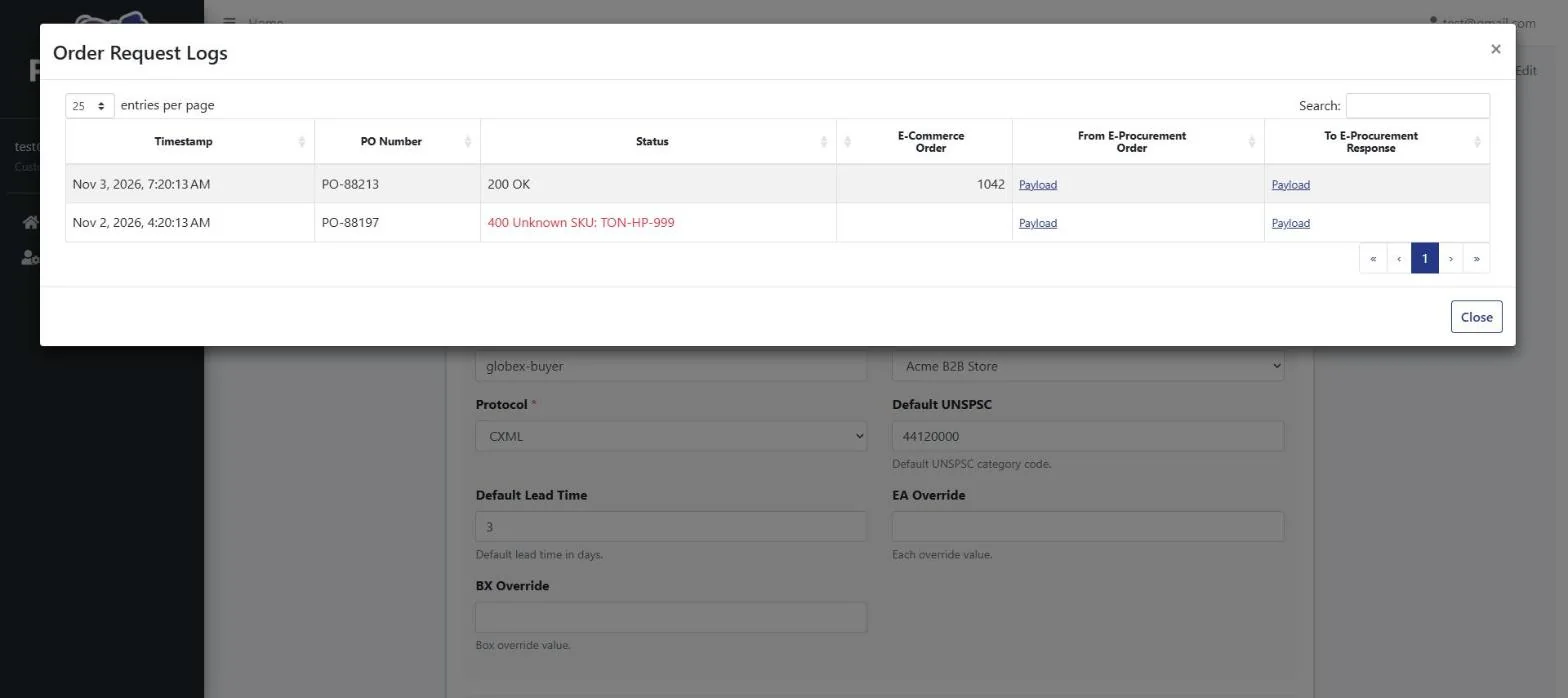
In the Order request Integration section of the end customer, click Check Logs. For each purchase order you see the time, the PO number, the result, the number of the order created in your store, the order received from the procurement system and the response sent back.
7. Frames, procurement systems and the reverse proxy
Why procurement systems use frames
SAP Ariba, Coupa, Jaggaer and other systems often open the supplier’s store inside a frame, so the buyer never leaves the purchasing system. This creates two browser problems:
- frame-ancestors: the Content Security Policy of the store does not allow the procurement portal to show it in a frame, so the frame stays blank.
- SameSite cookies: the browser rejects the store’s cookies inside the frame, so the buyer is logged out or loses the cart.
How the reverse proxy solves it
- The buyer clicks PunchOut in the procurement system, which sends a cXML or OCI request.
- PunchOut Rocket serves your store’s pages under its own domain, so the browser sees a single trusted origin.
- Cookies are first-party, so SameSite rules do not block them.
- The buyer shops as usual and the cart returns to the procurement system via cXML or OCI.
You do not need to change your server configuration.
Disable optimisation plugins that inline files
Minification plugins such as Autoptimize can inline CSS or JavaScript as Base64 data URIs. When the proxy rewrites the URLs these files break: the layout looks wrong or scripts stop working.
- Fix: before connecting, turn off HTML minification, CSS and JS combining and asset inlining. For example: Autoptimize, the “Combine files” options of WP Rocket, the HTML minification of LiteSpeed Cache. Page cache plugins that do not change the asset URLs are generally safe.
- How to check: look in the page source for
data:text/css;base64,ordata:application/javascript;base64,.
Disabling the reverse proxy (advanced)
The proxy is on by default and we recommend keeping it on. If you turn it off, the buyer’s system opens your server directly and you must configure:
- a
Content-Security-Policy: frame-ancestorsheader that allows the domain of the procurement portal; SameSite=None; Secureon the session and login cookies.
These settings change with each procurement system and must be updated for every new portal domain. In most hosting panels they are under the server header and cookie settings. Details in the iframe error guide.
8. Troubleshooting
| Symptom | Likely cause | What to check |
|---|---|---|
| The session does not start | Credentials or shared secret do not match | The protocol settings of the end customer (4.3), compared with the buyer’s supplier documentation; try the test page (6.1) |
| Blank frame or login lost | Frame headers or cookies | Use Reverse Proxy is on (3.4); iframe error guide |
| Broken layout or scripts in the PunchOut | Optimisation plugin inlining CSS or JS | Base64 data URIs in the page source (7) |
| Wrong catalogue or prices | Wrong user to clone | E-commerce User to Clone and its role in your store (4.2) |
| Cart rejected by the buyer | Missing classification or unit codes | Category mapping, Default UNSPSC and unit overrides (4.2, 4.4) |
| The buyer does not see the predefined carts | Feature not in the plan, carts expired, or the buyer is editing an existing cart | Plan features (3.5), Expires on of each cart (4.5) |
| A purchase order is not imported | Unknown SKU, From identity of another end customer, or missing order methods | Order logs (6.3) and order methods (4.6) |
Still stuck? Write to support@punchoutrocket.com with the end customer name and the time of the session from the log.
FAQ
Setup questions
Do I need a credit card for the trial?
No. The 30-day free trial starts without a credit card and includes all the features.
What is the difference between Standard and Premium?
Both include PunchOut with cXML and OCI. Premium adds predefined carts and the import of purchase orders (OrderRequest).
Can I change plan later?
Yes. From the site page you can upgrade or downgrade at any time: the change applies at once and the amount is prorated.
Where do I find my API key?
For nopCommerce, PrestaShop and custom platforms, click Generate in the site settings of the PunchOut Rocket platform. Only the last 4 characters are shown after saving.
Which store user should I clone for a buyer?
A dedicated user in your store, created for that buyer, whose role and permissions give access to the buyer’s catalogue and contract prices.
Can I load a predefined cart from Excel?
Yes. Download the template from the cart, fill it in and click Import from Excel.
I forgot my password. What do I do?
Click Forgot your password? on the login page and follow the link you receive by email.
Do I need to change my server headers?
No, as long as Use Reverse Proxy is on. You only need to set frame-ancestors and SameSite cookies if you turn the proxy off.
30-day free trial · no credit card
Your buyer is waiting. Let’s launch.
Install the plugin today and run your first test session this afternoon. If your deadline is close, tell us and we will handle your request with priority.